Puzzle Of A Chair

Briseyda Duran

After working on modules for a while we have decided to start on our maker project, we had some trouble in coming up with an idea that would help us and our community. We didn’t just want to do a normal chair we wanted to make something unique. When the idea of a double sided chair came to us, we weren’t really sure about how we would make it even more unique.

When Ms.Sauter came up with the idea of making a 3D printed chair we weren’t sure about how it was gonna come out and how we would make such of a chair in a small 3D printer, After Ms.Sauter mentioned that we could build every piece of the chair separately and then connect it together the idea was becoming much clearer and much easier to build. We still needed to design what the chair was going to look like we weren’t 100% sure that we still wanted to do a double sided chair because we didn’t have much time left to complete it.

In the end we decided to make a one sided 3D printed chair that might have some storage at the bottom to store things. We are gonna have to 3D print different parts of the chair every day and have the next design ready for the other day so we don’t waste time. When we have the chair or should i say parts of the chair we will put them together.

Catapults and the Importance of Prototypes by Astrid J.

For our maker project, we are building a catapult. Hopefully it will be displayed at the school’s “Make-o-Rama.” The Make-o-Rama/Makerfaire is where we, makers, get to show off our work. It is very much like the Austin Makerfaire.

Our catapult will be designed to help tennis players get better at their sport. The catapult will throw tennis balls for them to hit. Catapults are not very accurate and consistent ways of throwing things, so this will help our client get better at hitting the balls wherever they are shot, so this forces them to move to get the ball.

So far, we have made a blueprint and a prototype. You can see pictures of the prototype below. We will soon begin building the actual thing. Through this project, I learned about the importance of prototypes. Prototypes can help you to figure out how big things need to be, what needs to be in place in order for it to work and gives you practice for when you go to build your actual product.

The strategy we used to build our prototype was to have all the measurements be half the size of our proposed design for the real catapult. This helped us get a good idea of size comparisons because everything was proportional. We could easily tell if the arm was too long or if we needed to add an extra half inch to our base width. When designing our catapult, we forgot about a hole that needed to be in place in order for it to work. We didn’t realize we needed it until we built our prototype. Since we used Adobe Illustrator to laser cut the cardboard for our prototype, adding the extra hole for the real thing was an easy fix. The third thing a prototype does is give you practice. We were able to see how the building process would work while making the prototype. We also got comfortable with the hand saw that we will be using to cut our dowels for the catapult.

IMG_0477 IMG_0478

We hope our catapult will work and be able to help tennis players everywhere.

Girl Power!!- My First Time Using Power Tools

For my maker-project my group is constructing a doll house, it’s a standard model, made of wood. The process would be no problem for my teammates, they all did the engineering modules, so they knew what they were doing, but I didn’t. Of course there were other things that I could do, making the dolls or wait for them to finish so I could decorate, but still there would be a short amount of time that I wouldn’t be doing anything, and I didn’t want to be dead-weight. So the next time we were in the maker-space I asked one of my team member what needed to be done, she said the frames still needed to be nailed together, so I asked her how to use the drill. After she went through the basics on how to use a drill she made me practice on a wooden block to make sure I got it down. Admittedly I was a little scared at first, but after I got that first nail in I knew I would be fine. So then, after properly learning how to drill, we got to work, by the end of the day we had finished three frames. I think learning how to use power tools is very useful, not just for pltw but for life, a lot of men think that they’re superior because they know how to use a saw or drill, but now a lot of girls my age are learning, which I think is really great. girl power!!

IMG_1068

Out of my Dome By: Elly G

When the place that we call the “Makerspace”, first opened up, I was afraid I would havemakerspace no use for it. The Makerspace was made from a grant given to our school by Intel. The space contains a garage door, multiple working spaces, tools such as saws (hand and electronic), hammers, drills, a laser cutter and much more. I thought that the class of PLTW would be another year of the occasional and rare visit into the space, if seriously needed. I was most definitely wrong.

We started the year straight off. Each different lesson you could learn online had to do with some certain aspect on hands on things, whether it be through a program or on wood. I started my module in Biomedical, as I thought it would be a breeze to go through. While in that module, I was always sidetracked by the innings and outings of new things made in the space. I constantly heard drills and saws; work being done. I made a promise to myself there that I would try new things that year, and push myself out of my comfort zone. Not like cutting my thumb off-which thankfully has not happened-but by learning to use the space to my advantage.

Slowly, but surely, I started to use things. Starting with the drills, moving on to saws, then eventually to my favorite, the Laser Cutter. I learned through my intelligent friend McClain, that by creating a piece in Adobe IllustraIMAG0517tor, you could transfer that piece through a USB, engraving or cutting it into wood, acrylic, etc. Now that I know these things I use them every class period. Here’s a picture of a recent aspect of my latest project. To the right is a picture of the Laser Cutter I sawing its way through Fluorescent Acrylic.       

       Overall think the statement made by the Makerspace can teach those afraid to learn new things. Just like hearing “Pythagorean Theorem” and cringing. Not only did I come out of my own dome of fears, I also made my own statement. I can make new things, learn new subjects, and teach others just as well as anyone, as long as I have the right tools to do it.

From Modules to App Design by: Marlene Mora

I know I used to write about modules and now I have something new to share with you. Recently I started my maker project. I am working with Carolina and we decided we wanted to make an app. This would be no ordinary app though. This app would be specifically designed to help girls at Ann Richards. Many of you do not know but our school is very technology oriented and we depend on many websites and apps to help us be successful. So we came up with an idea that if we had an app that gave us quick and easy access to everything, life here at Ann Richards would go much smoother. Of course neither of us knew anything about making an app so we had some help from Nepris.com and a guy named Nick who designed apps. He told us some cool but confusing information and all these cool websites and softwares. Of course we were excited but we started getting a little nervous. There was so much information! Especially a lot of acronyms. We did start having a mental plan though which is what Carolina and I are planning on executing soon.

Our first job was to have a plan then wire frame (a.k.a. a layout) and then prototype. We currently finished the wire frame on Adobe Illustrator and are going to use Flinto.com to help set up our prototype. I’m excited because this website helps us actually download the app to preview on a phone.

Our app is supposed to have a calendar/ agenda where the school’s main event calendar was synced and so are any personal events. Having an agenda on our phones would also be quicker to access and since it would be able to send reminders we wouldn’t be as likely to forget our homework. We would probably also have email, homework calendar, important links, and maybe games. I cannot wait for our final product!! Or at least our prototype ^_^ I will keep you guys updated. ARS Helper App

Support Austin Schools MakerFaire Project by Allegra

Support Austin Schools MakerFaire Project

By Allegra


In PLTW, we have something called a MakerFaire. A MakerFaire is an event celebrating our engineering classes accomplishments, and is where we show off our inventions. For my MakerProject, my team and I have created a non-profit website that will help underfunded schools in Austin, TX.


Our website is going to allow people to volunteer or donate to ten Title One schools that are located in Austin. We decided to do this project because we (My team and I,) have all come from a Title One school, and we remember how hard it was to get a full education there.


For this project, we have had to learn many things. I’ve had to learn HTML coding, and my partner had to learn Adobe Photoshop. These skills will definitely help us in life, as many jobs today require knowledge of the computer world.


This project is also part of my Girl Scout Silver Award project. For the Silver Award, I have to create a long lasting project that helps the community outside of Girl Scouts. This project will definitely help the community around me, or at least I hope it will.


I’m very excited to show the website at the MakerFaire. I really want to help people, and I feel that this website will.

Robots, Robots, Robots. By: Jacinda P.

Building robots.
Robots are very cool but when it comes to creating them they aren’t that easy especially if it’s your first time.
During our time building the robot it required much attention because when building a robot you can easily get mixed up and attach the wrong parts and there goes your whole project. You have to be very tedious and alert so you can make sure you and all of your team is on track and not lost. Even if you’re not working on the robot at the time you still have too much attention because when It’s your turn to work on the robot you don’t want to be lost and mess up the project for the rest of the group.
Robotics is A module that i personally thought was very confusing but it also sparked some interest in me because i chose to do engineering next year for my pathway and knowing things like this will help me next year through my projects or assignments and will makes things a little less confusing.
Everyone should have a say in the group because during a project you are able to pick a certain three robots to create and even though building the robot is very difficult to create and can be very stressful you still want to be interested in what your building and want to be involved. I personally, in my group, thought it was fair that we all got a say I what we wanted to build and that is exactly what we did we both looked over the certain robots that we had to choose from and both decided on the three that we wanted to build.
In a group you have to get along to work together. So if in class you get put in a group with someone you don’t like then you have to be mature and get your work done because if one person is building the robot and they get frustrated with the other partner while building the robot you all are going to have to resolve the problem you both have and just get the work done because when you are building a robot it takes a long time and you don’t want to waste any time when building your robot. You and your group must work fair and square .
At the end of the day you have to remember to stay focused and work hard and stay on task when building a robot but also have fun with it.

Automation and Robotics

Automation and Robotics


In this Module I learned how to design and Build a robot while using some instruction.


First we had to research a robot and tell what it does and what functions does it have, what tasks it can complete and how it completes these tasks on its own and also were these things can be used.


Next we had to build a robot that can complete a task from a list and we picked the robot that can move 20 feet as fast as we could get it and we had to build the whole robot from scratch with vex robotics pieces. We also had to program the robot to complete this task.

                                    IMG_20150313_102145-1

While doing this we had to use the skills that we learned in a previous module which was called mechanical systems where we had to learn the different gear combinations and incorporate them in learning by cutting and gluing the different gear combinations in our journals and use those to learn the different pieces and the different ways you can use these.

images

-Calvinesha

Materials blog post – Yarisel

This time I tried the Materials module and what it basically was making a word image
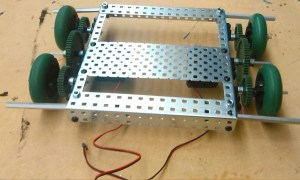
with different materials that you wanted. We used cardboard and plastic water bottles. But having to follow the requirement of it being at least 16 inches tall was probably the only big challenge we had, besides not being able to glue the water bottles together. Our requirements were :

The letters must be a minimum of 16” tall.

Minimum of 3 pieces.

Minimum of 3 materials.

You must use one meaningful object within your letter construct.

No paper or fabric.

The location for the signage must be an interior public place at the school and cannot be next to another word.

We chose the word love because when we looked around the school to see which words have they used we didn’t see love so we decided to use that word. We also had to find a good place for the word and that was by the big gym and the dance room. Because of the materials we chose it wasn’t necessary to use any drills or even a hand saw we used basic tools and that wasn’t as fun as i expected it to be. Besides that and the little challenges we had we worked well as a group and our communication throughout the group was excellent.