Creativity by Ginger Rodriguez

Creativity.

Such a great thing.

People may not realize it, but it is needed everywhere, not just in art, not just in music, but also engineering.

Of course, it takes engineering to create a song or an art piece, but I bet no one would expect to need creativity while creating something such as a dog house.

In my PLTW class, for our Maker Project, my group and I are making a Dog House. Everyone sort of has an idea of what a Dog House looks like. What we wanted to do was make a dog house, but make it different. We wanted it to be interesting. We didn’t want it to be something just anyone could find at any store.

My group and I thought of different ideas. The idea part is always one of the most challenging parts in creating and working on a project.

Everyone contributed different ideas. After idea and idea, we finally decided to take it back to what an original dog house looked like. We decided that we would like our dog house to be a two piece set. We were going to create an original dog house but add stairs on the side. That way not only could the dog sleep inside of the house, but during those nice days, when the weather is just right, the dog could climb the stairs and lay on top.

The way my group and I decided to make our dog house a two piece set, we decided that the stairs can be taken off if needed: for example if the dog owner was traveling with their dog somewhere and they needed to take off the stairs to fit the dog house.

My group and I are still working on our dog house idea, and we can’t wait to see the final product! image

Trials & Errors

By Sage O’Brien

Do you ever just wish you could control things with your eyes? Now, with Google cardboard glasses and apps that are made for your smartphone you can. These past few weeks Lily and I have been working with Adobe Illustrator, the laser cutter and cardboard to try to re-create our own cardboard gla1st Attemptsses. We have had many trials and errors and will face more in the future, but we have only learned from our mistakes. Our first attempt using the laser cutting ended up with lots of damp spots and even the engraved lines cut out. So we went back to square one and revised things on Illustrator. 2nd AttemptThe second time around we certain everything was going to turn out great, we even had this really nice, thick cardboard. Sadly, the nice, thick cardboard backfired on us and we had the opposite problem as before, was nothing cut out. But we learned from this to slow down the speed of the laser cutter comparing thicknessif we have thicker material. Our third try was last class; “third time’s a charm” they always say, not always. Last class we were fully confident that it was going to cut out perfectly because it felt like we had learned so much about Illustrator and the laser cutter, but it was only the beginning. On a good note, our third try was the best, and we actually got to fold some of what we cut out. Hopefully we’ll cut out a good one so we can start making even more pairs of glasses. But from experience, I know that it takes a long time to fully accomplish and master tasks, skills, and projects.   3rd Attempt 3rd Attempt (1)

Wooden Speaker By: Candace Castillo

Wooden Speaker:


So, this 6th weeks the entire class of PLTW has started to construct or come up with a maker project. Why, a maker project you may I ask? Because on April 24th, I believe, there is a fair called “Maker Faire”. Where you show your creations that you have fully thought of and worked so hard on, which is what we are doing. Some of the ideas that our fellow classmates have are making apps, catapults, dog houses, etc. People are really putting their creative thoughts into these projects.


Now, I have told you about my classmates projects and ideas. It is time to tell you what me and my partner, Arianna Nunez, have thought of. Do you guys remember in the beginning of the school year, we made those can speakers in the Biography room? Well, our idea is a bit similar to that particular project. Me and Arianna’s idea, was to make a wooden speaker. Sort of similar to can speakers that we made. The whole purpose of this project is to be able to amplify the sound, coming from the phone, with even using any electronic wiring.


Me and Arianna have been doing our research on the materials and ways to build the “perfect” wooden speaker. We had to look on tons of websites to find the right wood, that would amplify the sound in the best way. And, also some designs that were easy to make but, were also so unique and that would give our sound the best amplification. Currently, we already have our materials sent in to Mrs. Sauter and are awaiting their arrival. We are also waiting for our Nepris video chat so, we can get some feedback on what we have at the time.


My partner and I are very excited to see what our finished product will look and sound. We hope to start constructing soon, and are excited to, hopefully, take our project to the Maker Faire this year. Thank you for reading this far… wish us luck on our wooden speaker!


-Candace Castillo

Google Cardboard Glasses and the Need for Patience By:Lily Myers

The maker project, the google cardboard glasses has really been testing my partner, sage and mys patients, which is actually good. The google cardboard glasses are a virtual world is a program from google, and the idea where you program a virtual world app for typically the samsung phone and then use it by putting it in a crafted cardboard glasses so you can only see the glasses making it a virtual world. Sage and I are going to change it up by programming the app to iphone and instead of just ordering the google cardboard glasses kit we are going to make the google cardboard glasses by putting it on Illustrator and printing it out on the laser cutter.

Google-Cardboard-VR-3D-Glasses-Kit-Clone-Easy-Assembly-Simple-VR-Full-Kit
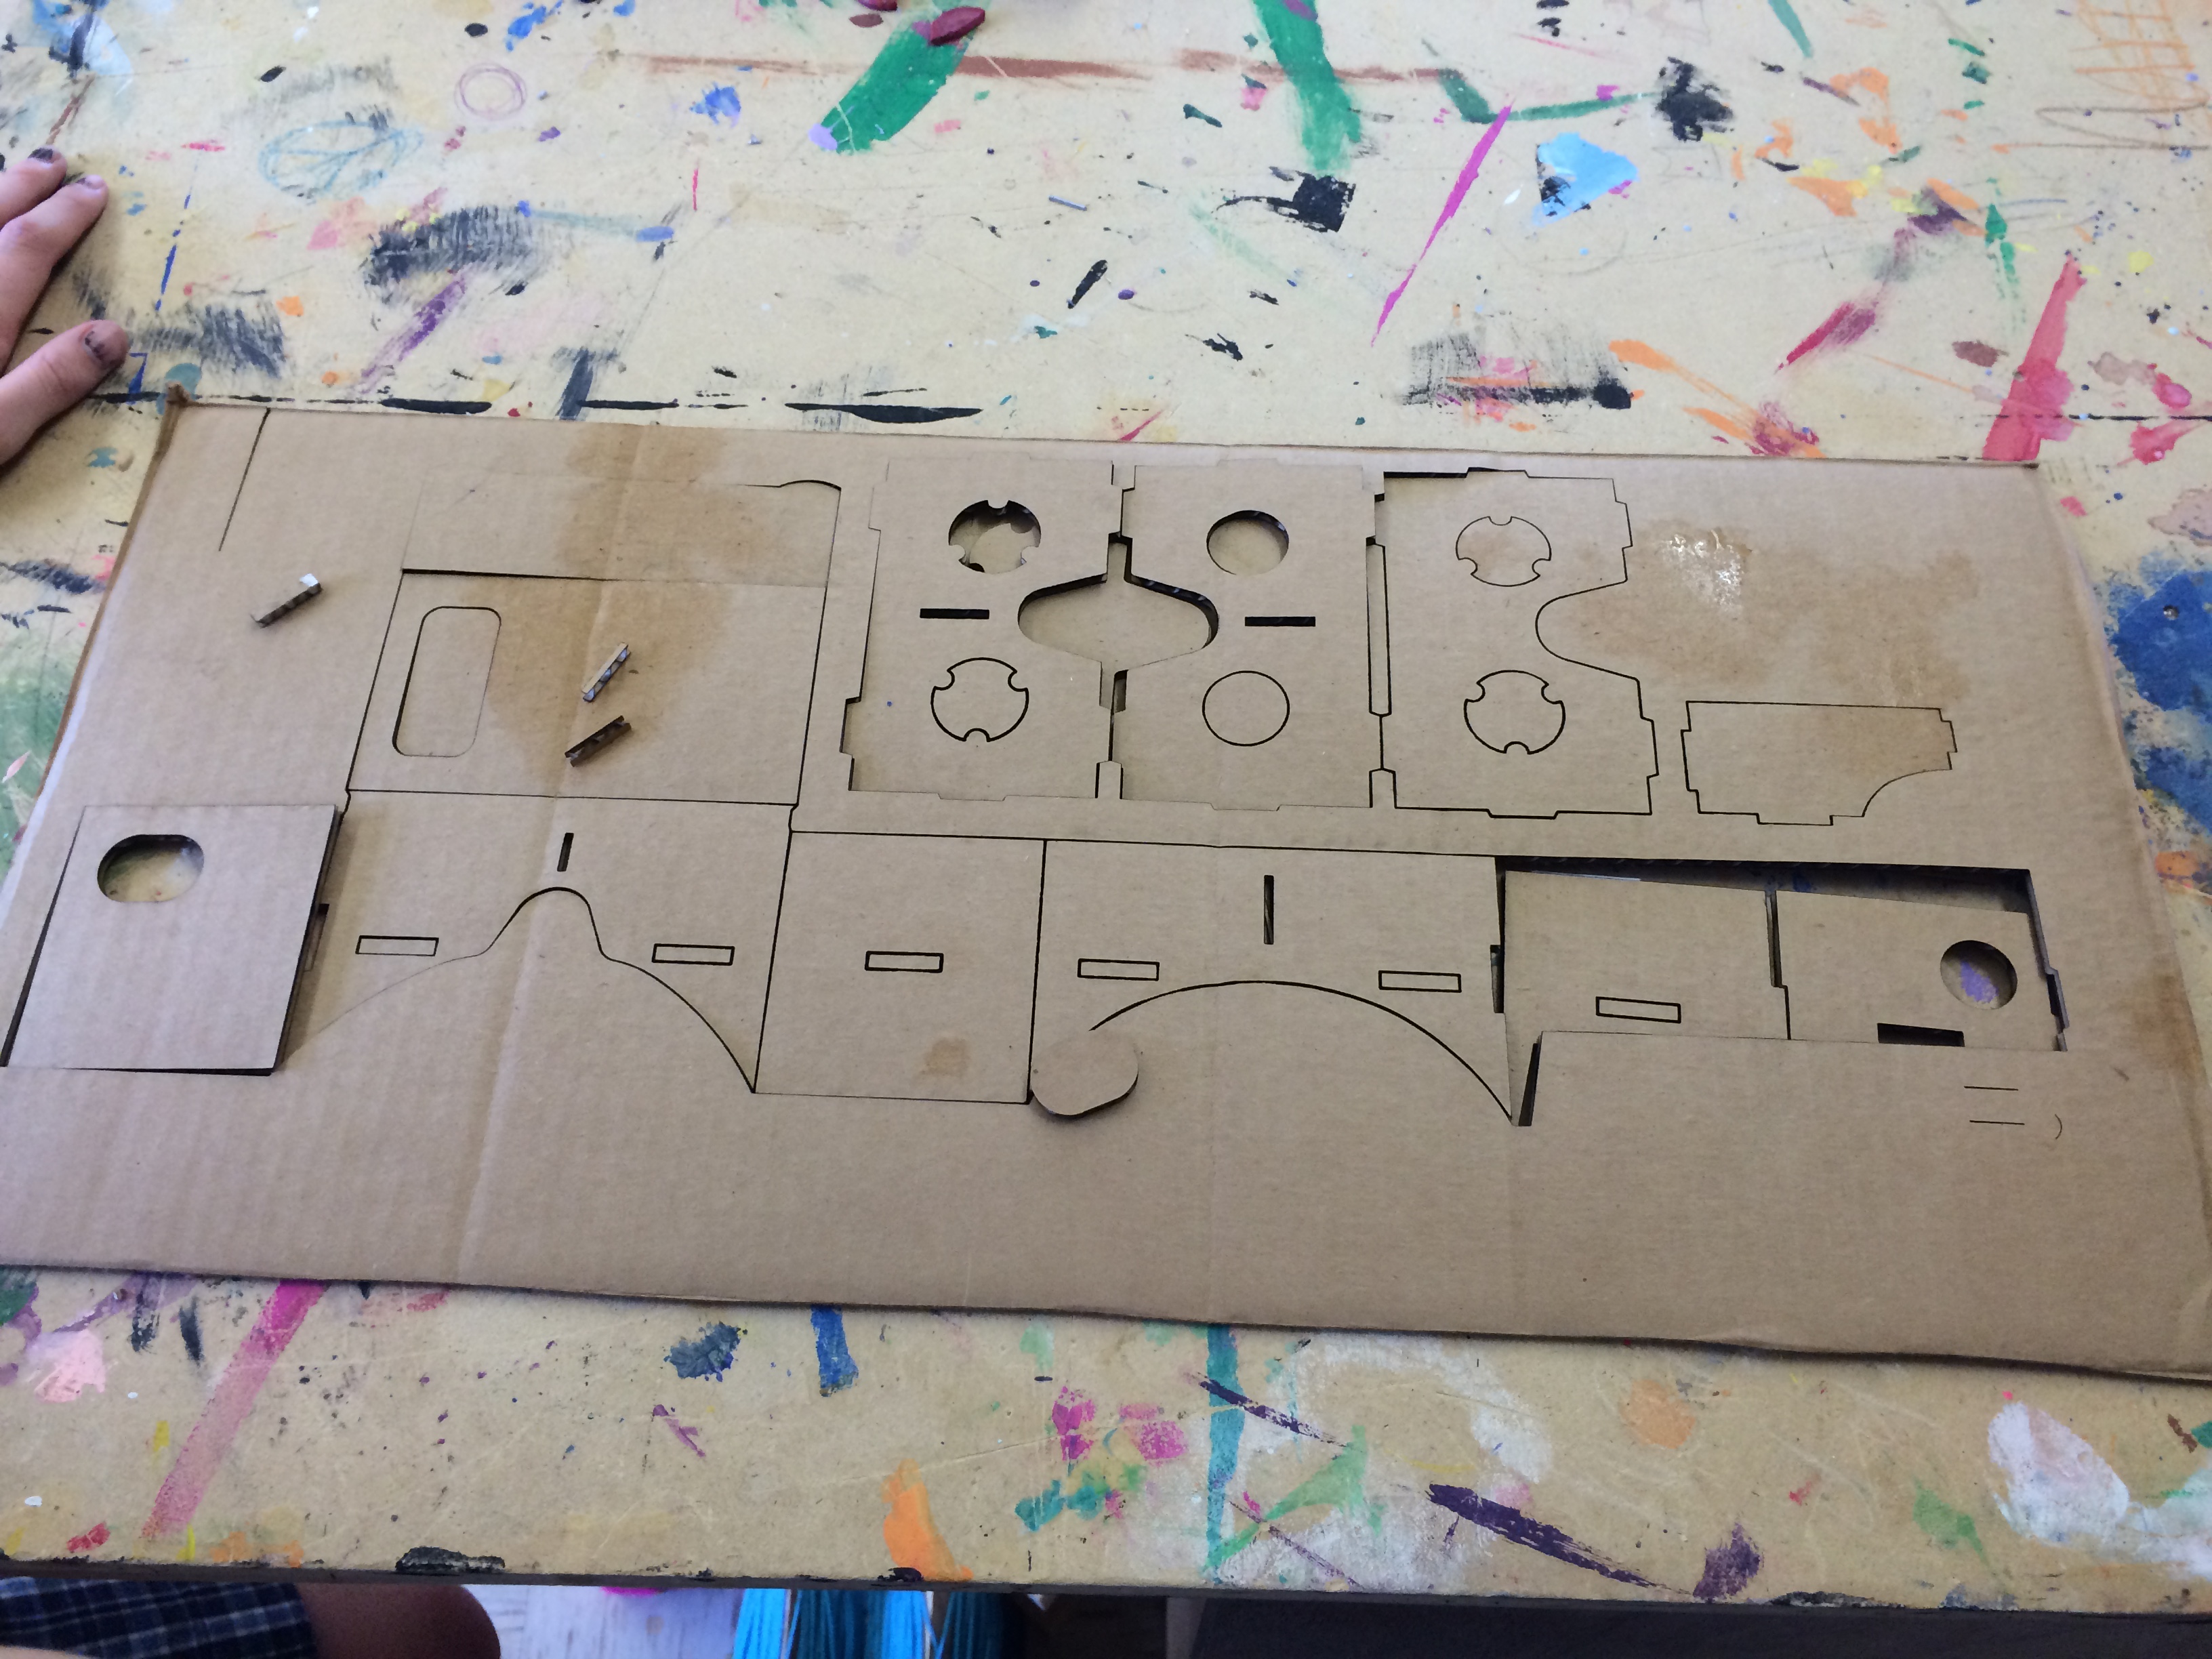
We have been stuck on the first part of our project, to cut out the google cardboard on the laser cutter( the second part is programming the app) made patience more and more needed. The first part of this project is us finding a outline that we could easily converted the file to pdf and put into the program Adobe Illustrator. Then measured out the cardboard and laser printed. Simple right, no that actually faile, we not only realized that we were missing a piece in the outline but we realized all the lines where printing all the way through. We got another out line for iphone specific cardboard glasses and changed the line colors. Then the cardboard was too thick. We slowed down the speed and made the engraved lines dotted yet the cardboard again was too thick. We still are trying to print out our glasses. We learned that patience is very important because although we feel like quitting and probably a lot of other makers do as well. You have to keep trying and pushing and accepting and learning from failure or nothing would ever happen.

Let’s Play Checkers! By: Sierra Green

All throughout this year in PLTW, our teacher Mrs. Sauter has talked about the upcoming Maker Faire. We have to make a project to present to this Maker Faire. As of last month, we have started to work on our project. The students in my class are making some pretty cool things with the 3D Printer, laser cutter, and so much more!

My group decided that we would like to make a checkerboard set. We thought that this would be a very cool thing to make. We also thought that this could help develop our skills with using the 3D printer and the laser cutter. Once, we decided this, we decided that we want to make the checkerboard out of wood and the checker pieces out of plastic from the 3D printer. We are still working on making our final project, but I want tell you about what we have done and what we are doing right now.

When we started this project, Mrs. Sauter suggested that we do the 3D printing module to help us a little with 3D printing. As you might already think, the module really did help. We learned what plastic types the 3D printer uses (PLA and ABS), what the 3D printer reads to make our object (Computer Automated Drafting or CAD), and so much more information. Overall, this module was really fun.

Once we finished this it was time to start making our checkerboard. My group member Alexis and I worked on designing our checkerboard on a software called Adobe Illustrator. My other group members Melanie, Catherine, and Elissa worked on the designing of our checker pieces on this other software called 123D Design. I designed a checker piece that my group members used to build off of and eventually made a lot better! My whole group put lots of effort into our designing and now we have our prototypes for our project done!

In conclusion, I really like doing this project with my group members. I learned and am continuing to learn teamwork and resilience. Even though we are halfway done with our project, we will continue to put all of our effort into our checkerboard.

Photo on 4-2-15 at 2.10 PM #2

(This is our prototype checkerboard.)

Our Journey By Melanie Arce

For our Makerfair project my group (Alexis, Sierra, Elissa T., and Catherine) are creating  a checkerboard. Our checkerboard is gonna be designed by us and its going to be cut out by the laser cutter and our star checker pieces are going to be created by using the 3D printer. This project has been a really fun experience and a stressful experience.

         Originally our group had no experience using the 3D printer so we had to work on our Makerfair project and work on the 3D Printing module. We were very far behind on the project and on the module which created a lot of stress but luckily we got through it and started working harder. We had to create many outlines for our checkerboard and our checkerboard pieces and we had to use a lot of different programs to make it work.  We had to save our files so many time and recreate a new one. This project takes a lot of patience and its a process that you have to get used too.

         I learned so much from the 3D printing module and our Makerfair project. I learned the process of what you have to look for when buying a 3D printer. You have to make sure the 3D printer you’re buying is stable enough for what you’re creating on it because some 3D printers can shake a lot when creating a product so always looks for that in 3D printer. Also all 3D printers are not the same, some 3D printers can create items at a faster pace than other and can include more details into a product. I also learned different computer programs that you can use to make your 3D product out of. I learned that instead of using Inventor we can use 123D Design which made it a whole lot easier for us because its much more simpler then Inventor, I like 123D Design more because its simple and its not very complicated to use. Inventor has a lot of whole different varieties of buttons to click on which makes it a whole lot difficult for me and my group. We also learn how to use Illustrator and thats where we created our star checker piece and then created a SVG file and then imported it into 123D Design then created that whole file into a STL file, so I even learned how to import a file and also learned what kind of file needs to be use in order to 3D print our product. So I learned a lot through this experience and it was a fun journey, all we need left is to 3D print our star checker pieces and make a few changes then we will be done.

Maker Project Catherine Gavin

While in my group we worked on the 3D printing module, as to prepare for our Maker Project which will include 3D printing. For our Maker Faire we will be laser cutting a piece of wood, and shading it to make a checkerboard pattern, and then designing checker pieces in what we were thinking maybe a star to represent school spirit, and then printing them out on the 3D printer. We thought that doing this module would be beneficial towards helping us learn how to 3D print, because until now none of us, in my group, new how.


Mrs. Sauter recommended that we use a program called 123D to design, because the program we used last year was a bit more complex than what we needed for our project. 123D was very easy to use and although I had to mess around with it a bit to get the hang of it, I ended up getting it. I wanted to design something that could be used and not just a random piece of plastic. So I talked to some of the people in my class, and some thought that jewelry would be a great thing to print. And then McClain said that she really loved it when animals were on jewelry. So I decided that I should somehow incorporate an animal. Because the plastic we were printing with was hard, and not stretchy I didn’t think it would be smart to try and make a necklace, bracelet or earrings. And because it was an easy design I made a ring. And with McClain’s idea in mind, I put a cute cat face with whiskers on it. After I saved it correctly (as a STL file) Elissa and I plugged it into the printer and printed it. We actually had to go back to the file and reprint the ring 3 times because the sizing was off, and wouldn’t fit correctly on a finger, or it was too thin and could break.


We will use the skills that we learned while doing this module and apply it to our Maker Project. I now know how to use the 123D design application and can use it to complete to project successfully.

Maker Project (app making)- Carolina Vazquez

During these past weeks I and a partner have started on our maker project. This is where everyone in our grade make their own imagination come true. We have a class can either work together or can work alone in their own project. Me and my partner’s maker project is to create an app that will help all of our school. Meaning that it’s an educational app, we will have everything we need on an everyday basis in one place. This will make our ARS lives a lot easier.

Coming into this project knowing not much about softwares and making an app was hard. Because we basically knew nothing about this subject so we had to learn everything from an expert. He taught us all about how to create a prototype and how we will make an app.We have also learned about all the different software technology needed for this app. So far we only have our prototype, but I know that it will be ready by it’s due date. We have been working really hard in this app and we hope that in the end we will be able to achieve our goal.

During this learning experience to we knew how difficult it would be. But I and my partner know how to communicate and work very well together. And that’s a key point to a successful project.

If we go far enough we could potentially send it to Apple or Android to make it be a real app.

This is our imagination coming to life.

And we can’t wait to see your end result. Thank you.

The Start of Something New – Jasmine A.

This week, we have been working on designing our skateboard, we had four different designs, and we ended up all voting on the same one. We decided that just keeping a “simple” design would be straight up boring, so we decided that it would be best to add a quote in the middle of the skateboard.

It has basically been the planning period for us, figuring out what we want to do, and how we’re gonna do it. We also get to put in what we want to be added to  the deck, like our own personal attributions, the things that each of us individually think would look good on the board.

We are finally planning on how we are gonna assemble the board, and what we are gonna use to make the board itself, the wood finally came in so we are planning how many layers we need to keep the board itself sturdy, when it is actually made we will eventually need grip tape to make it look like an actual skateboard that you would see in a store.

The Struggle is Real

Payton M.

The Struggle is Real

This Maker Project has been the hardest thing I’ve ever had to do in my life, and we’re barely getting started…

For my Maker Project, my group is making a projector for phones. Our project consists of a shoe box, magnifying glass, phone stand, and a speaker. The idea is you place your phone on the phone stand and the magnifying glass will project whatever you play on your phone, and as for the speaker that’s pretty self-explanatory. When we first started the project, I thought the purpose of the projector was for fun, like to project a movie on your ceiling or something. Since then, I’ve learned that the actual purpose is to make presenting projects or ideas easier.

The reason this project is such a struggle for me I think is the structure. Now, I don’t mean that it’s disorganized or anything, I just mean that we have to make our own project. Me personally, I work better on projects that have set instructions to follow, 1, 2, 3, and done. While I’m very stressed and frustrated with this project, I’m also glad to have the opportunity to experience how things work in the “real world.” I’ve come to realize that this project is an amazing opportunity that I wouldn’t have at a school like Paredes, or Akins, and I should appreciate this opportunity and take every advantage that it gives.