For our maker project, we are building a catapult. Hopefully it will be displayed at the school’s “Make-o-Rama.” The Make-o-Rama/Makerfaire is where we, makers, get to show off our work. It is very much like the Austin Makerfaire.
Our catapult will be designed to help tennis players get better at their sport. The catapult will throw tennis balls for them to hit. Catapults are not very accurate and consistent ways of throwing things, so this will help our client get better at hitting the balls wherever they are shot, so this forces them to move to get the ball.
So far, we have made a blueprint and a prototype. You can see pictures of the prototype below. We will soon begin building the actual thing. Through this project, I learned about the importance of prototypes. Prototypes can help you to figure out how big things need to be, what needs to be in place in order for it to work and gives you practice for when you go to build your actual product.
The strategy we used to build our prototype was to have all the measurements be half the size of our proposed design for the real catapult. This helped us get a good idea of size comparisons because everything was proportional. We could easily tell if the arm was too long or if we needed to add an extra half inch to our base width. When designing our catapult, we forgot about a hole that needed to be in place in order for it to work. We didn’t realize we needed it until we built our prototype. Since we used Adobe Illustrator to laser cut the cardboard for our prototype, adding the extra hole for the real thing was an easy fix. The third thing a prototype does is give you practice. We were able to see how the building process would work while making the prototype. We also got comfortable with the hand saw that we will be using to cut our dowels for the catapult.


We hope our catapult will work and be able to help tennis players everywhere.

 no use for it. The Makerspace was made from a grant given to our school by Intel. The space contains a garage door, multiple working spaces, tools such as saws (hand and electronic), hammers, drills, a laser cutter and much more. I thought that the class of PLTW would be another year of the occasional and rare visit into the space, if seriously needed. I was most definitely wrong.
 tor, you could transfer that piece through a USB, engraving or cutting it into wood, acrylic, etc. Now that I know these things I use them every class period. Here’s a picture of a recent aspect of my latest project. To the right is a picture of the Laser Cutter I sawing its way through Fluorescent Acrylic.
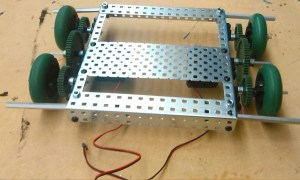
 with different materials that you wanted. We used cardboard and plastic water bottles. But having to follow the requirement of it being at least 16 inches tall was probably the only big challenge we had, besides not being able to glue the water bottles together. Our requirements were :
 u decide was the best to solve your problem and making sure it works and if it doesn’t work make changes. Last but not least, evaluating solution is just making sure your problem is solved.