Compromise is Comprowise

Our school promotes team building and problem solving in groups. A big part of getting along with your team is to be able to compromise your ideas. Obviously not everyone will have the same idea as you because not everyone is going to agree on everything. And personally, if everyone agreed on every topic it would be sort of weird. There would be no need to debate on why you think a certain way because no one would be there to challenge you. You would never be questioned and therefore your idea wouldn’t be as unique and it wouldn’t really matter what you thought if it was the same as everyone else anyways.

To work well with your group members you need to be okay with compromise. Compromise is when you take your idea along with someone else and mix them together. Even though you may not be thrilled to have to compromise it’s a way that everyone can get a part of what they want. When everyone has different ideas, it’s best to listen to them and see their view and if you agree and like their idea then there is no reason to be stubborn about yours. Make sure you limit the ideas to the top few that most people like and work from there to mix them together.

I think that compromising and being okay with not using your idea for everything is a really good skill .All throughout your life you are going to have to work with people who aren’t going to agree with you. Once you are comfortable with using others ideas and things that you didn’t want to do you will probably notice how much easier it is to work with other people.

In my maker project, my group is making bird clothes and for big decisions we learn to comprise on what the majority likes. Like the color of the closet we built or on the colors on the clothes. In the picture below, it shows our closet with paper clips as hangers with tutu’s hanging.

Displaying IMG_5897.JPG

-Nicole R

Dress for Fair?

Sophia N.

8th Period

Last post I’ve made was about our maker project. As you may conclude, my group and I have been wanting to make a dress for this project. We wanted to make this special, but it ended up being the worst fear we’ve experienced so far. I’ve never experienced this desire of making something impossible but ended up being too much for us to accomplish, especially since we’re just beginners on making something with sewing. My first day I’ve actually touched braids of cloth was in 5th grade. There, I only learned to hand sew (not anything helpful with this project).

All we knew at this time of sorrow, was that we definitely needed to make progress. Everytime we came to this class, is gonna start of by doing something that would make progress in making the dress. But most of the teammates couldn’t keep concentration, though they knew (and me) that the dress was gonna be impossible to be done before the due date. We were gonna need more time to achieve this goal or at least professional help. Finally, it came the day when we were gonna get help, we were gonna do more progress than that horrible time, though we figured it out too late. Not late but not imagebly possible to have at least a big product be done by then. So we went to the only place that we can get help from. The librarian.

The librarian at our school is very active, funny and talented. She can help students to good with belongings; with our books, and helps students out with anything else.

For this case, we went to ask our librarian, Ms. Mauser, if she can help us sewing.

At early days I already knew she knew how to sew because she announced it a long time ago. She said, after school sewing lessons are available. I never really saw myself as that talent but now is for a big purpose.

Anyways, going back to what I was saying. Ms. Mauser helps us to get started at sewing. My group and I had to watch some videos before starting the real lessons. We took notes during the videos so we can have little flashbacks to what we’re supposed to do with the sewing machines. All of us understood the videos and started trying out the first steps to start off a sewing machine. You thread the machine as the first step and then you put your fabric. You stomp the fabric with the foot (the sewing machine foot). Later you just press the paddle that’s on our right  foot and slowly let the thread go through and out the fabric. Slowly moving through edges and doing some curves here and there. I would imagine myself doing that with the dress, but unfortunately…I don’t think we’re gonna have time to finish the dress if we’re barely beginning this practice and one of our teammates wasn’t there to get the needed practice to get use to sewing. Our amazing librarian suggested us to start off slow, to maybe do something less big, maybe a “potato” bag could make a good fit for the time given. We all agreed, we’ll start off by making something small and then making the actual thing. For beginners, I would know that “potato” bags would be perfect for this beginning project. Walking with a soft and fashionable structure beside you, ain’t that bad. We’re only using this starter pack as our first result but I’m hoping we would do the actual mesmerizing, fashionable artifact that we’ve been planning on doing. Keeping our hopes, finger crossed.

Our Playhouse

IMG_6089

This is the first wall frame that we made for our house.


by: Prisila Samaniego-Marin

Hi, today I will be writing about my experience during the maker project process. My group and I are building a playhouse for small children ages 3-6.


We started building our house, and it’s been fun. We went through the whole design process. We brainstormed measurements, made a sketch, made a prototype, and now we are building. Although we are already building, we have a long way to go, and not a lot of time left. We are playing to present our house in the Make-O-Rama, or Maker Faire, which is an event at our school where a lot of projects will be showcased.


As I said before, we have a lot to do, and not a lot of time. That is something that stresses me out a bit because I really want it to be showcased in the Maker Faire since we’ve been working very hard on it.


You may be asking, “What are you going to do with a house?” The answer is, we’re going to donate it. We were thinking of maybe donating it to Dell Children’s Hospital or the Ronald McDonald Foundation. I feel like donating it will be something really nice because our house will bring joy to kids and give them something to call theirs and to claim ownership.


I’ve really enjoyed this project and have hope that we will finish in time. Thanks for reading, talk to y’all later! (:

The City Skyline by Macy Nelms

This six weeks I have mostly been working on my maker project. When I was first trying to come up with an idea I had no idea where to start. One night I kept thinking how amazing it would be to make a model of Austin using the 3D printer. We live in such a beautiful city and I would love create the entire thing but that is way too ambitious and we only have two months. I decided that I still loved the idea I just need to compromise. I decided to just build the main skyscrapers and maybe the capital. In class the next day I asked my current partner Zoe what she thought and she loved the idea. After a little more planning and designing we decided on an idea and started our project, ready for the challenge.

Screen Shot 2015-04-09 at 6.09.39 PM

Currently we are creating all of the buildings along congress, starting at the Bat Bridge and continuing however far we can in the time given. So far we have created the Bat Bridge, the Radisson Hotel, Wells Fargo bank, and I am currently working on the One Congress building. We have been using a program called TinkerCAD it is a free website that you sign up for and you can create anything for the 3D printer.

Building these complex buildings on a computer program can be pretty difficult but we are up for the challenge. My partner and I had very little experience with the program, we used it for about a week during a module but when we first started working on this project we were still finding new things every day. Now that it has been about three weeks since we started the project I sometimes believe I am an expert but i’m just being cocky. We are less than half way through the project and I know it is going to be amazing, the buildings are looking great and we are moving along very quickly. Hopefully we will have built up the Frost Bank Tower by the time of our schools first ever Make-O-Rama!

A Builders Progress

For this month’s blog post I decided to talk about our wonderful maker projects. A maker project is basically just a project where we get to choose what we want to build. For my maker project I decided I wanted to make, a dog house. Unfortunately my dog house idea was put down when I realized the dog house could not be built because of the lack of help since it was just my friend Emelyn and I, Despite not being able to build my dog house, I went for the next big thing, a playhouse. My friend Prisila was making a Playhouse for little children out of wood with her group so I decided to join in because it was similar to what I was going to build but just a tad bit bigger. It only took a little bit of time to join the group and once in, the group welcomed me and accepted my help.

Since the group already had started their project before I joined they did all the sketches and the planning for the house and I came in just in time to start helping build the prototype. Once we finished our prototype we got in to building.

The first step of building a playhouse would be gathering materials, and to our luck there was some abandoned wood structures left around the school so we took the advantage and used the wood to build our frame for the walls of the playhouse. Of course before that we had to take apart the structures that were already built so one of my group members and I grabbed drills and removed the nails so that we could use the wood. During this time I gained the skill of using the hand drills and I’ve got to say, I’m pretty good at it.. 🙂

After all that was done we got to cutting the wood to the sizes we needed to build the frame of the playhouse. To be honest it was pretty hard to calculate where all of the wood was going to be placed but once we got the hang of it the making of the frame was a breeze. So far we have completed three frames out of the four walls we are going to build and one of those frames has a window on it which was a challenge we faced but eventually got through. Now all is left of our playhouse is our fourth frame, building the roof, the door, putting the whole thing together, painting the structure and then decorating the inside so it will be kid ready when we donate it to a cause that would like to have it.

Thanks for reading!

By Brenda Puente

Stitching Along By: Isabella V.

In February, I was super excited to start my Maker Project. I really wanted to make a quilt, because I thought that it was an amazing project that would only take the basic sewing skills that I have. I was looking at simple quilt designs on Pinterest, when I found this blog post with instructions on how to make an easy Half-Square-Triangle quilt.

IMG_9396 copy

http://www.cluckclucksew.com/2009/06/seeing-red.html

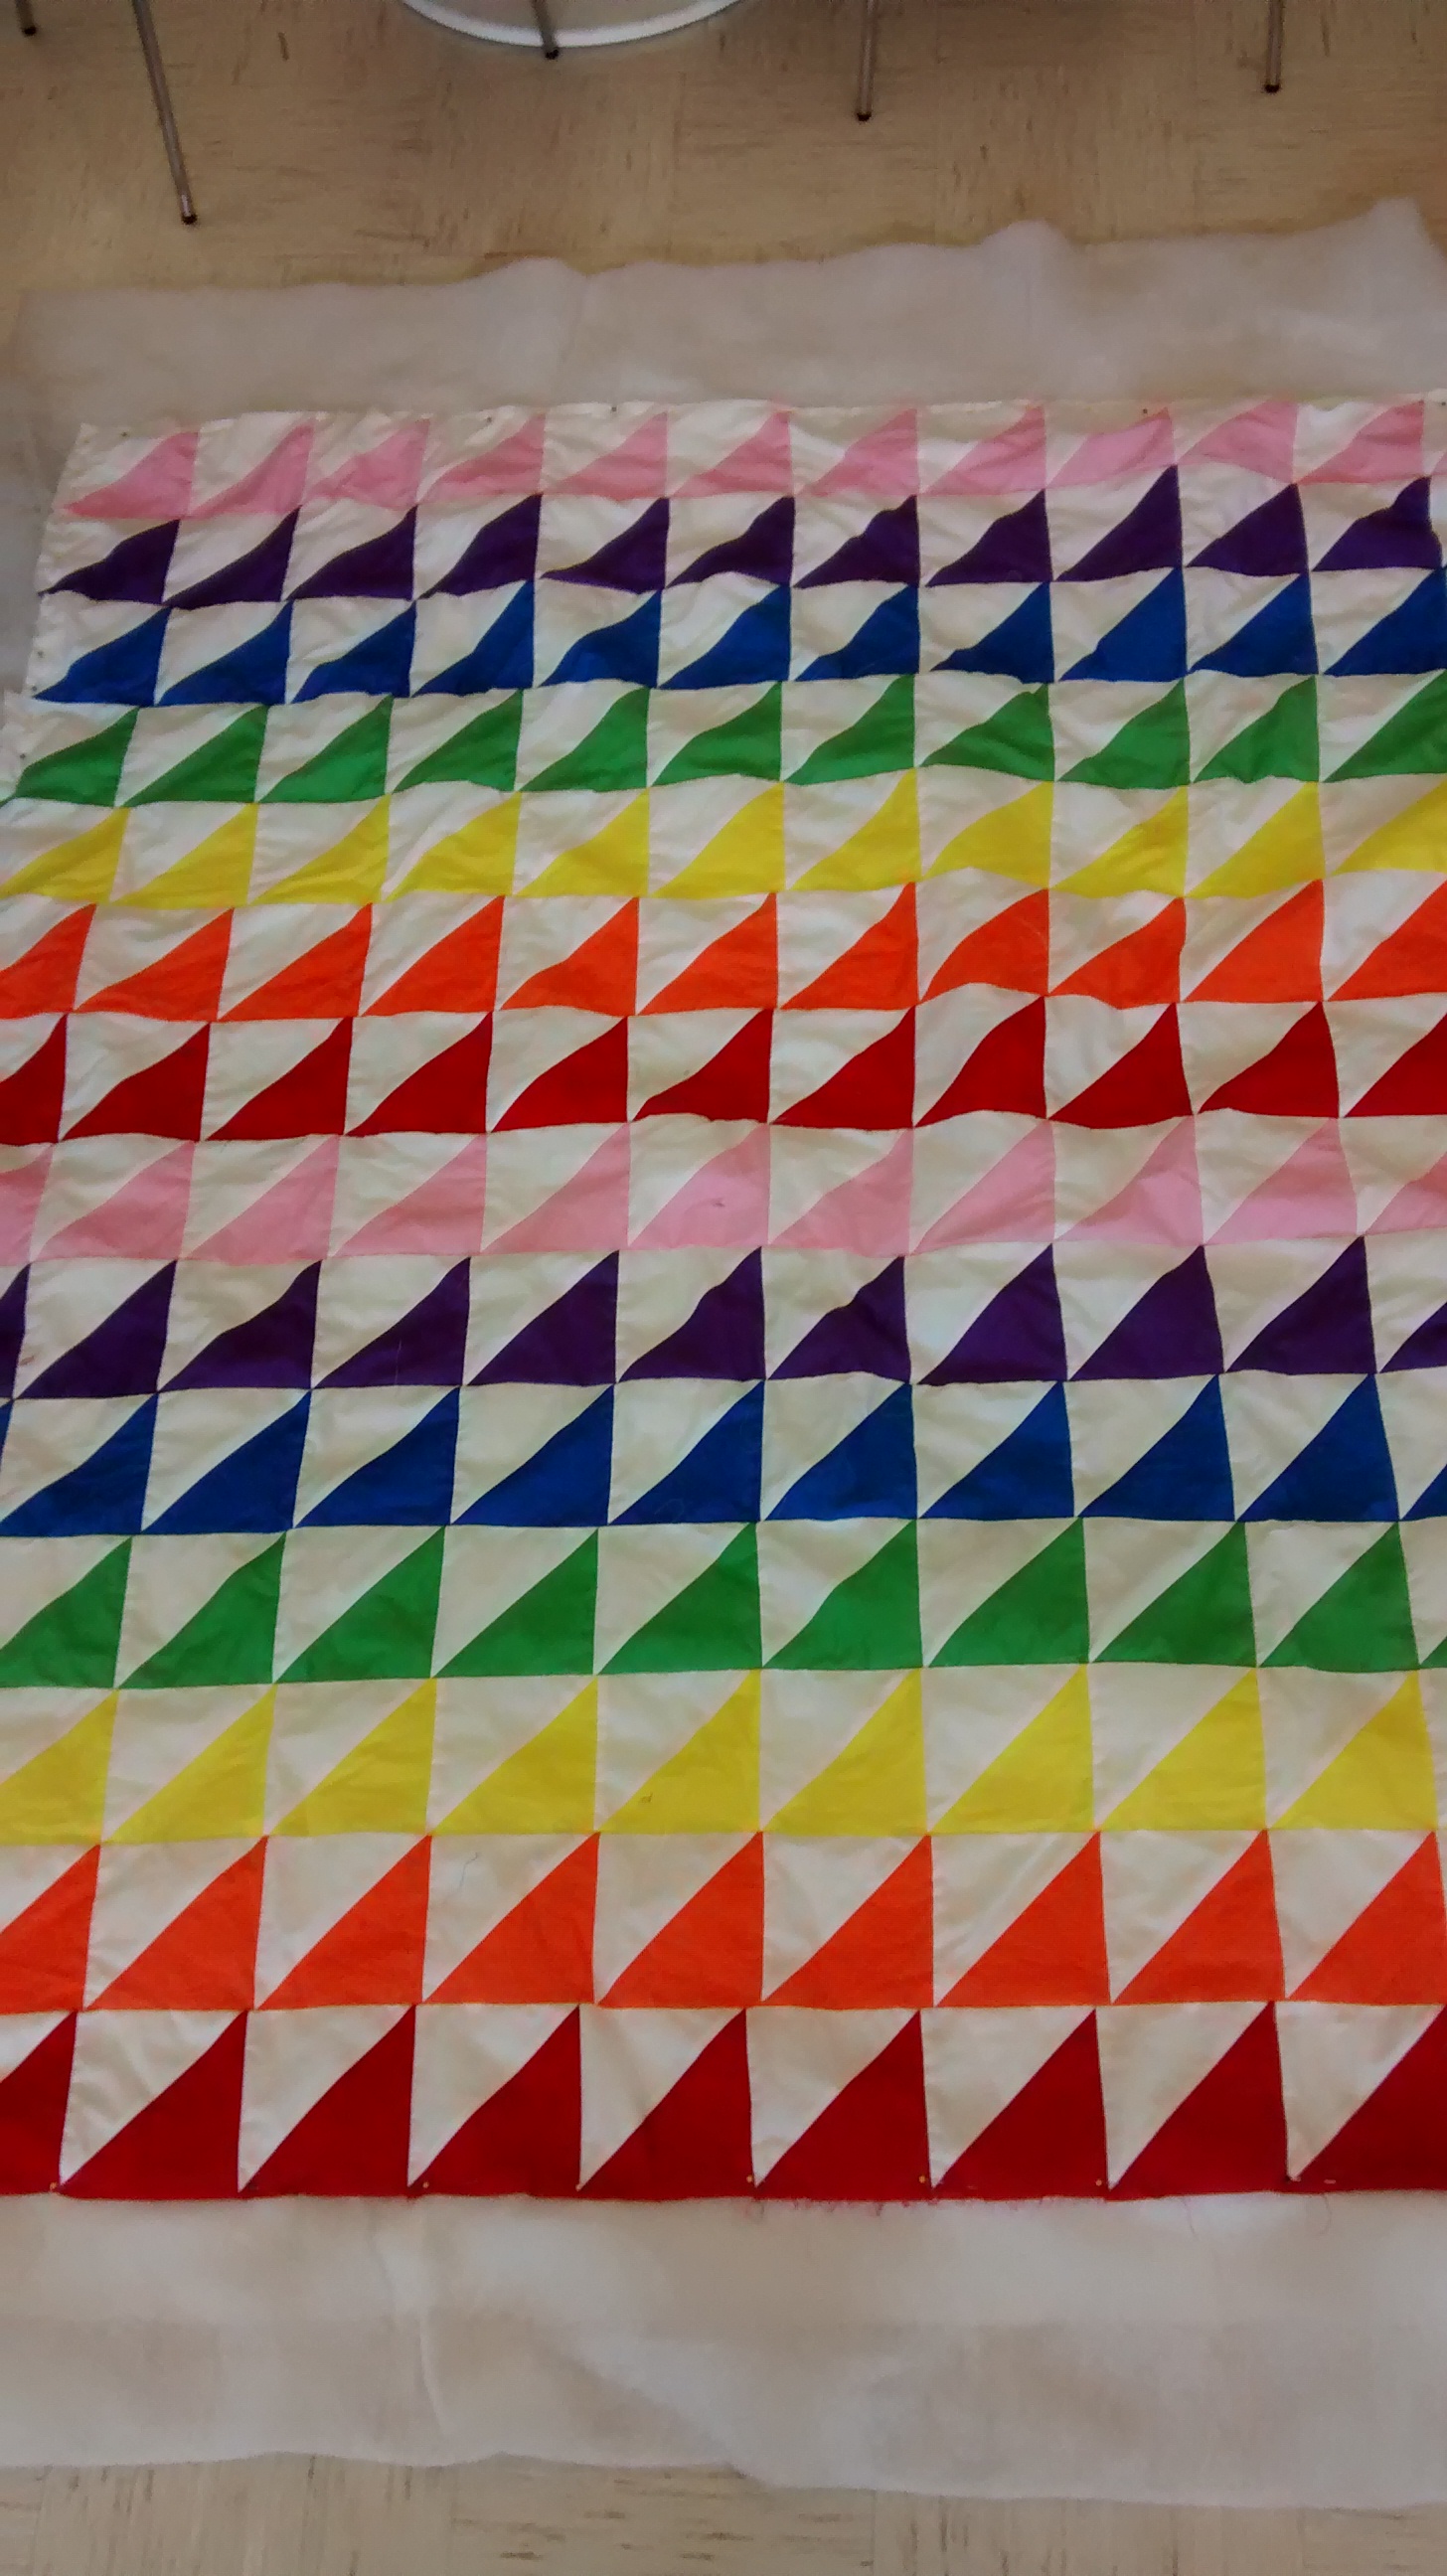
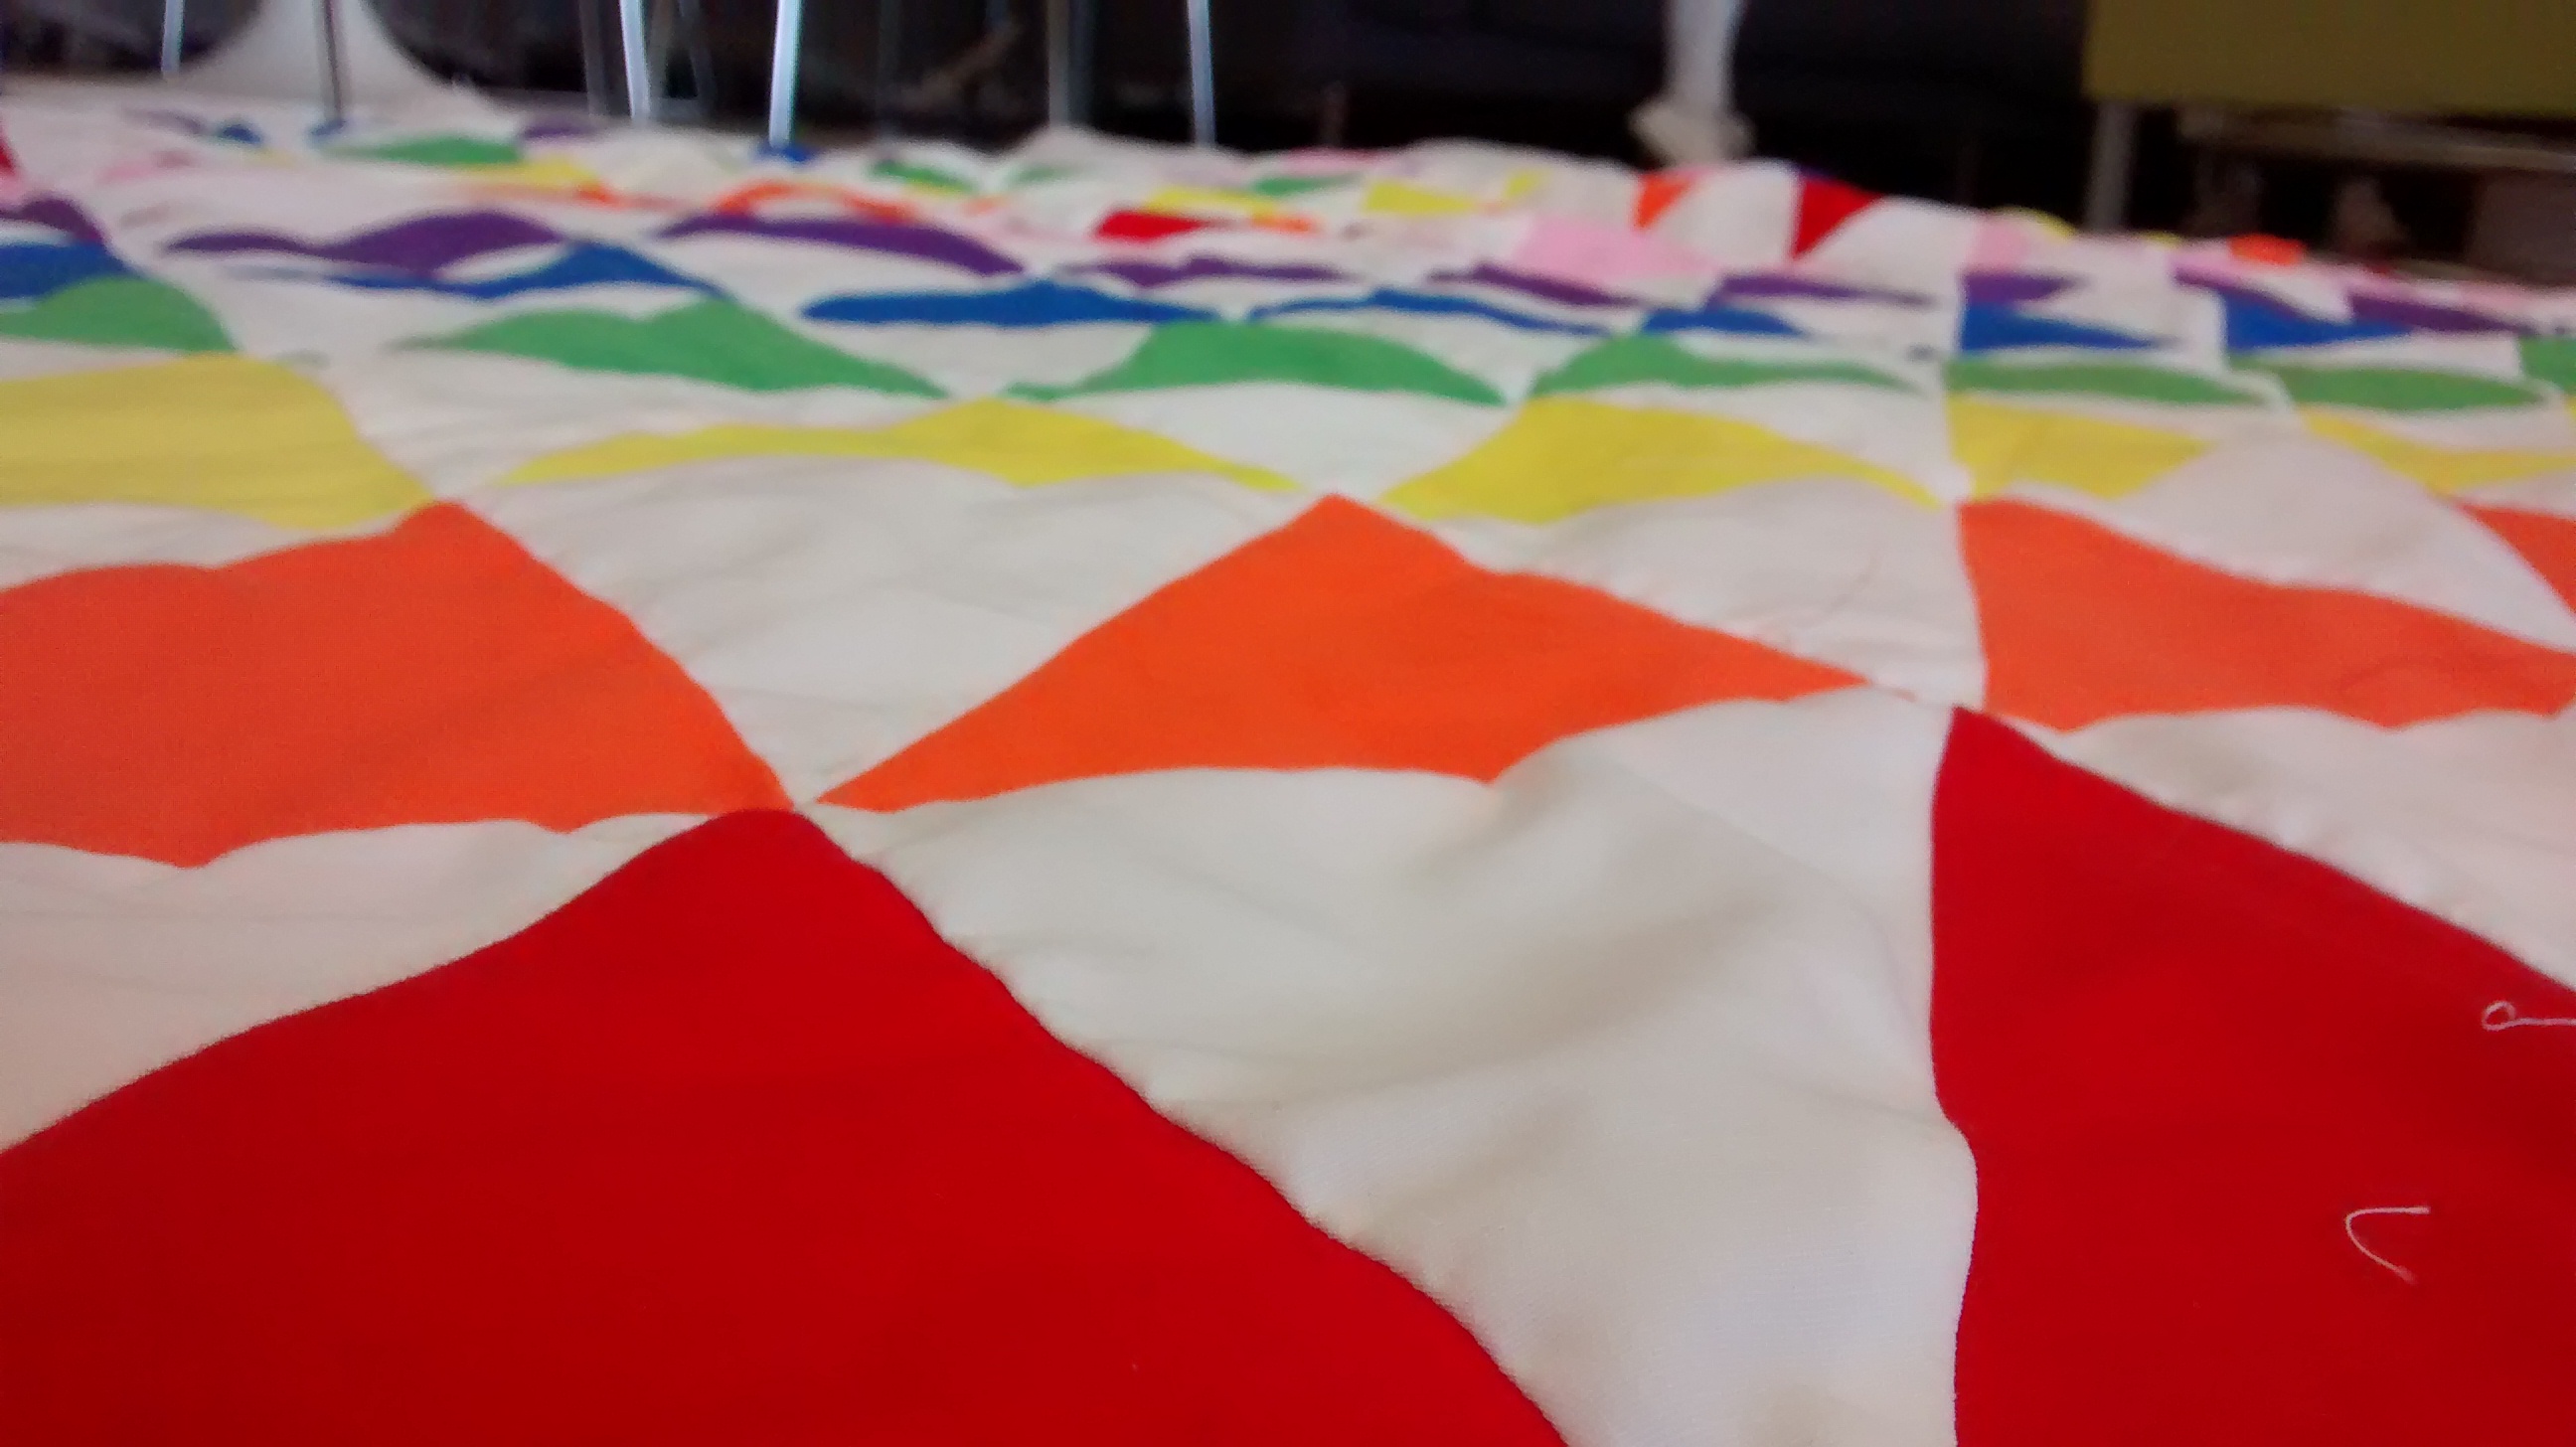
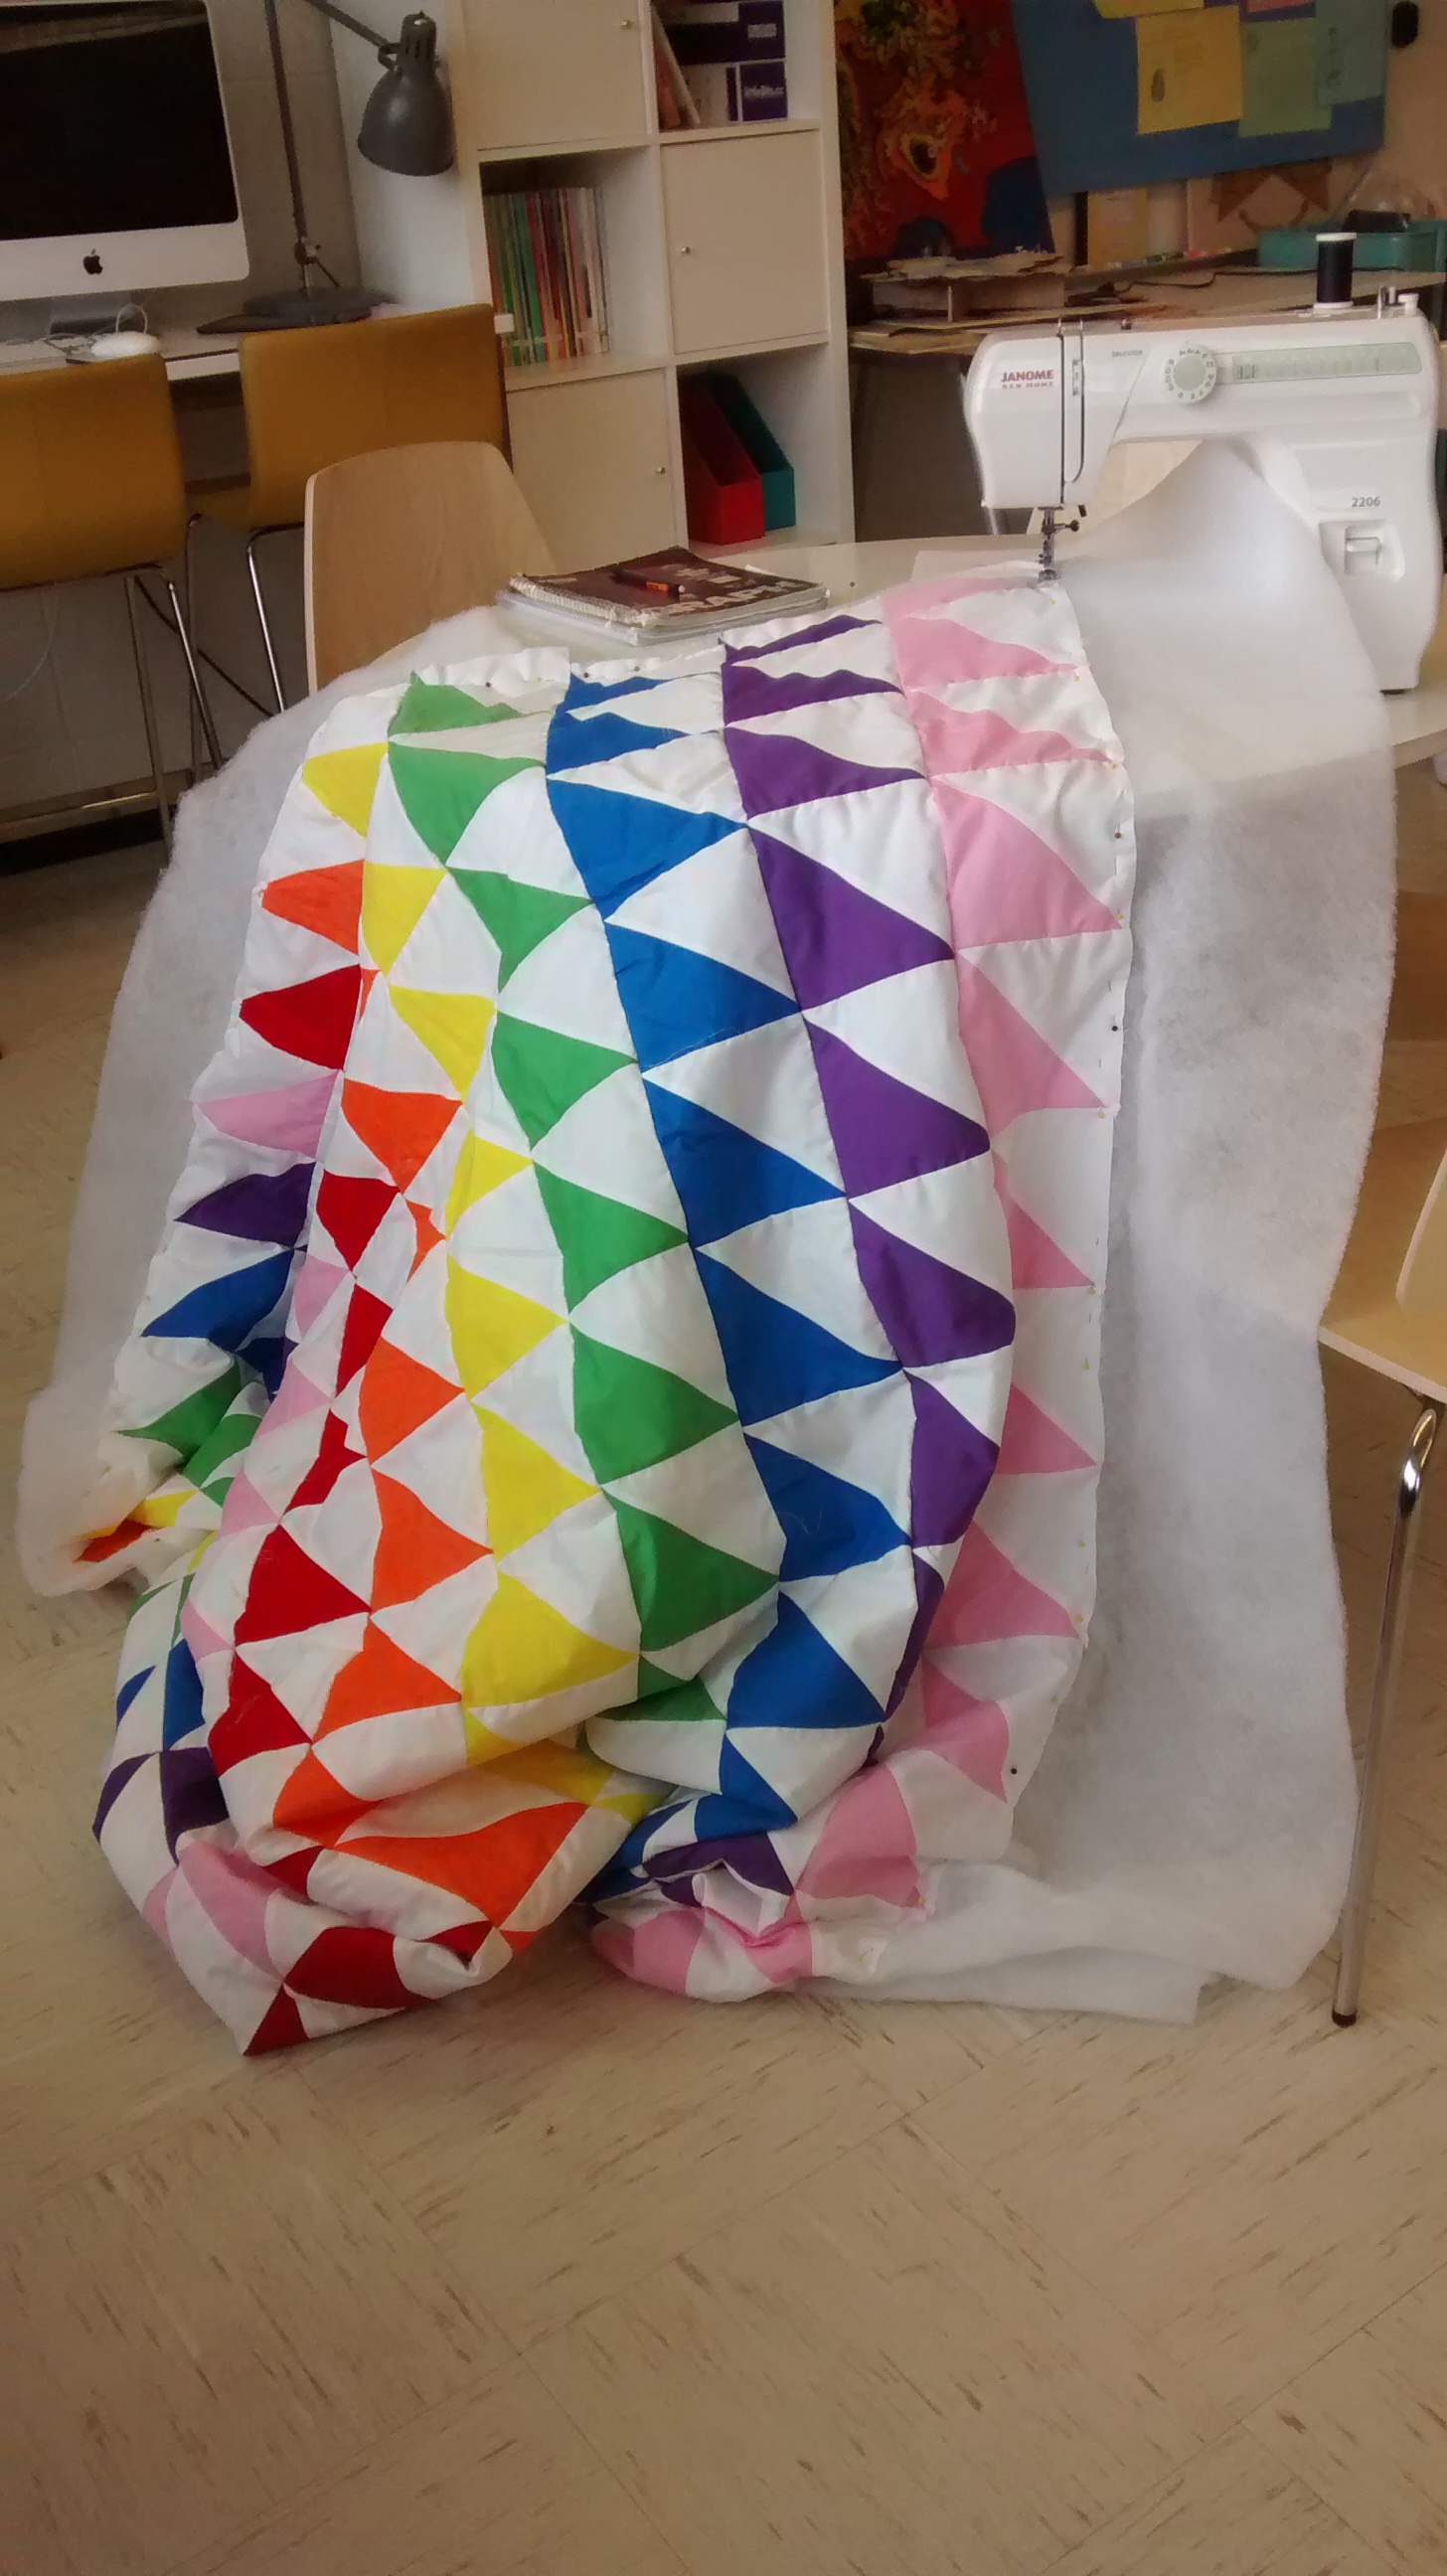
I modified the pattern a little so that it was white and rainbow-colored, because I absolutely adore rainbows, and I also made it a little bit bigger than what the pattern called for. It took me a lot longer to cut all the little triangles in the quilt than I expected, but when it was finally over, I was quite relieved because I was most afraid of cutting the squares.

After I had cut squares, I sewed the squares together, with two seams 1/4 inch away from the middle, then cut them down the middle. I had to sew a lot of these–180 squares! And once I finished these, I had to iron every single one, and it took hours. Once I had these squares, I sewed them into long strips, which I sewed together to created the rainbow pattern of my quilt. Halfway through doing this, I realized that I didn’t have enough colors, so I bought some extra pink. When everything was sewn together, I was finally done with the longest and most challenging part of my quilt!

After that, I took my quilt batting (which is like stuffing, but in a sheet form), and put it in between a long piece of plain white fabric and the top of my quilt. I laid this out, and pinned all around the edges.

My Quilt

My Quilt

Now, I have yet to sew around the edges, sew in the seams, and add a binding to the edges. Here’s what I have so far:

My Quilt (again)

My Quilt (again)

My quilt in the sewing machine in our Makerspace

My quilt in the sewing machine in our Makerspace

Quilt (folded up)

Quilt (folded up)

I’ve been super busy with my quilt, but for some reason, I had the bright idea of starting a whole other project… This Giving Bunny Project. I also got this idea off of Pinterest. Here’s the link:

http://www.urbanthreads.com/blog/?p=7487

I decided I also wanted to do this project before I realized how long my quilt would take me, so now I’m struggling to keep up with all the sewing.

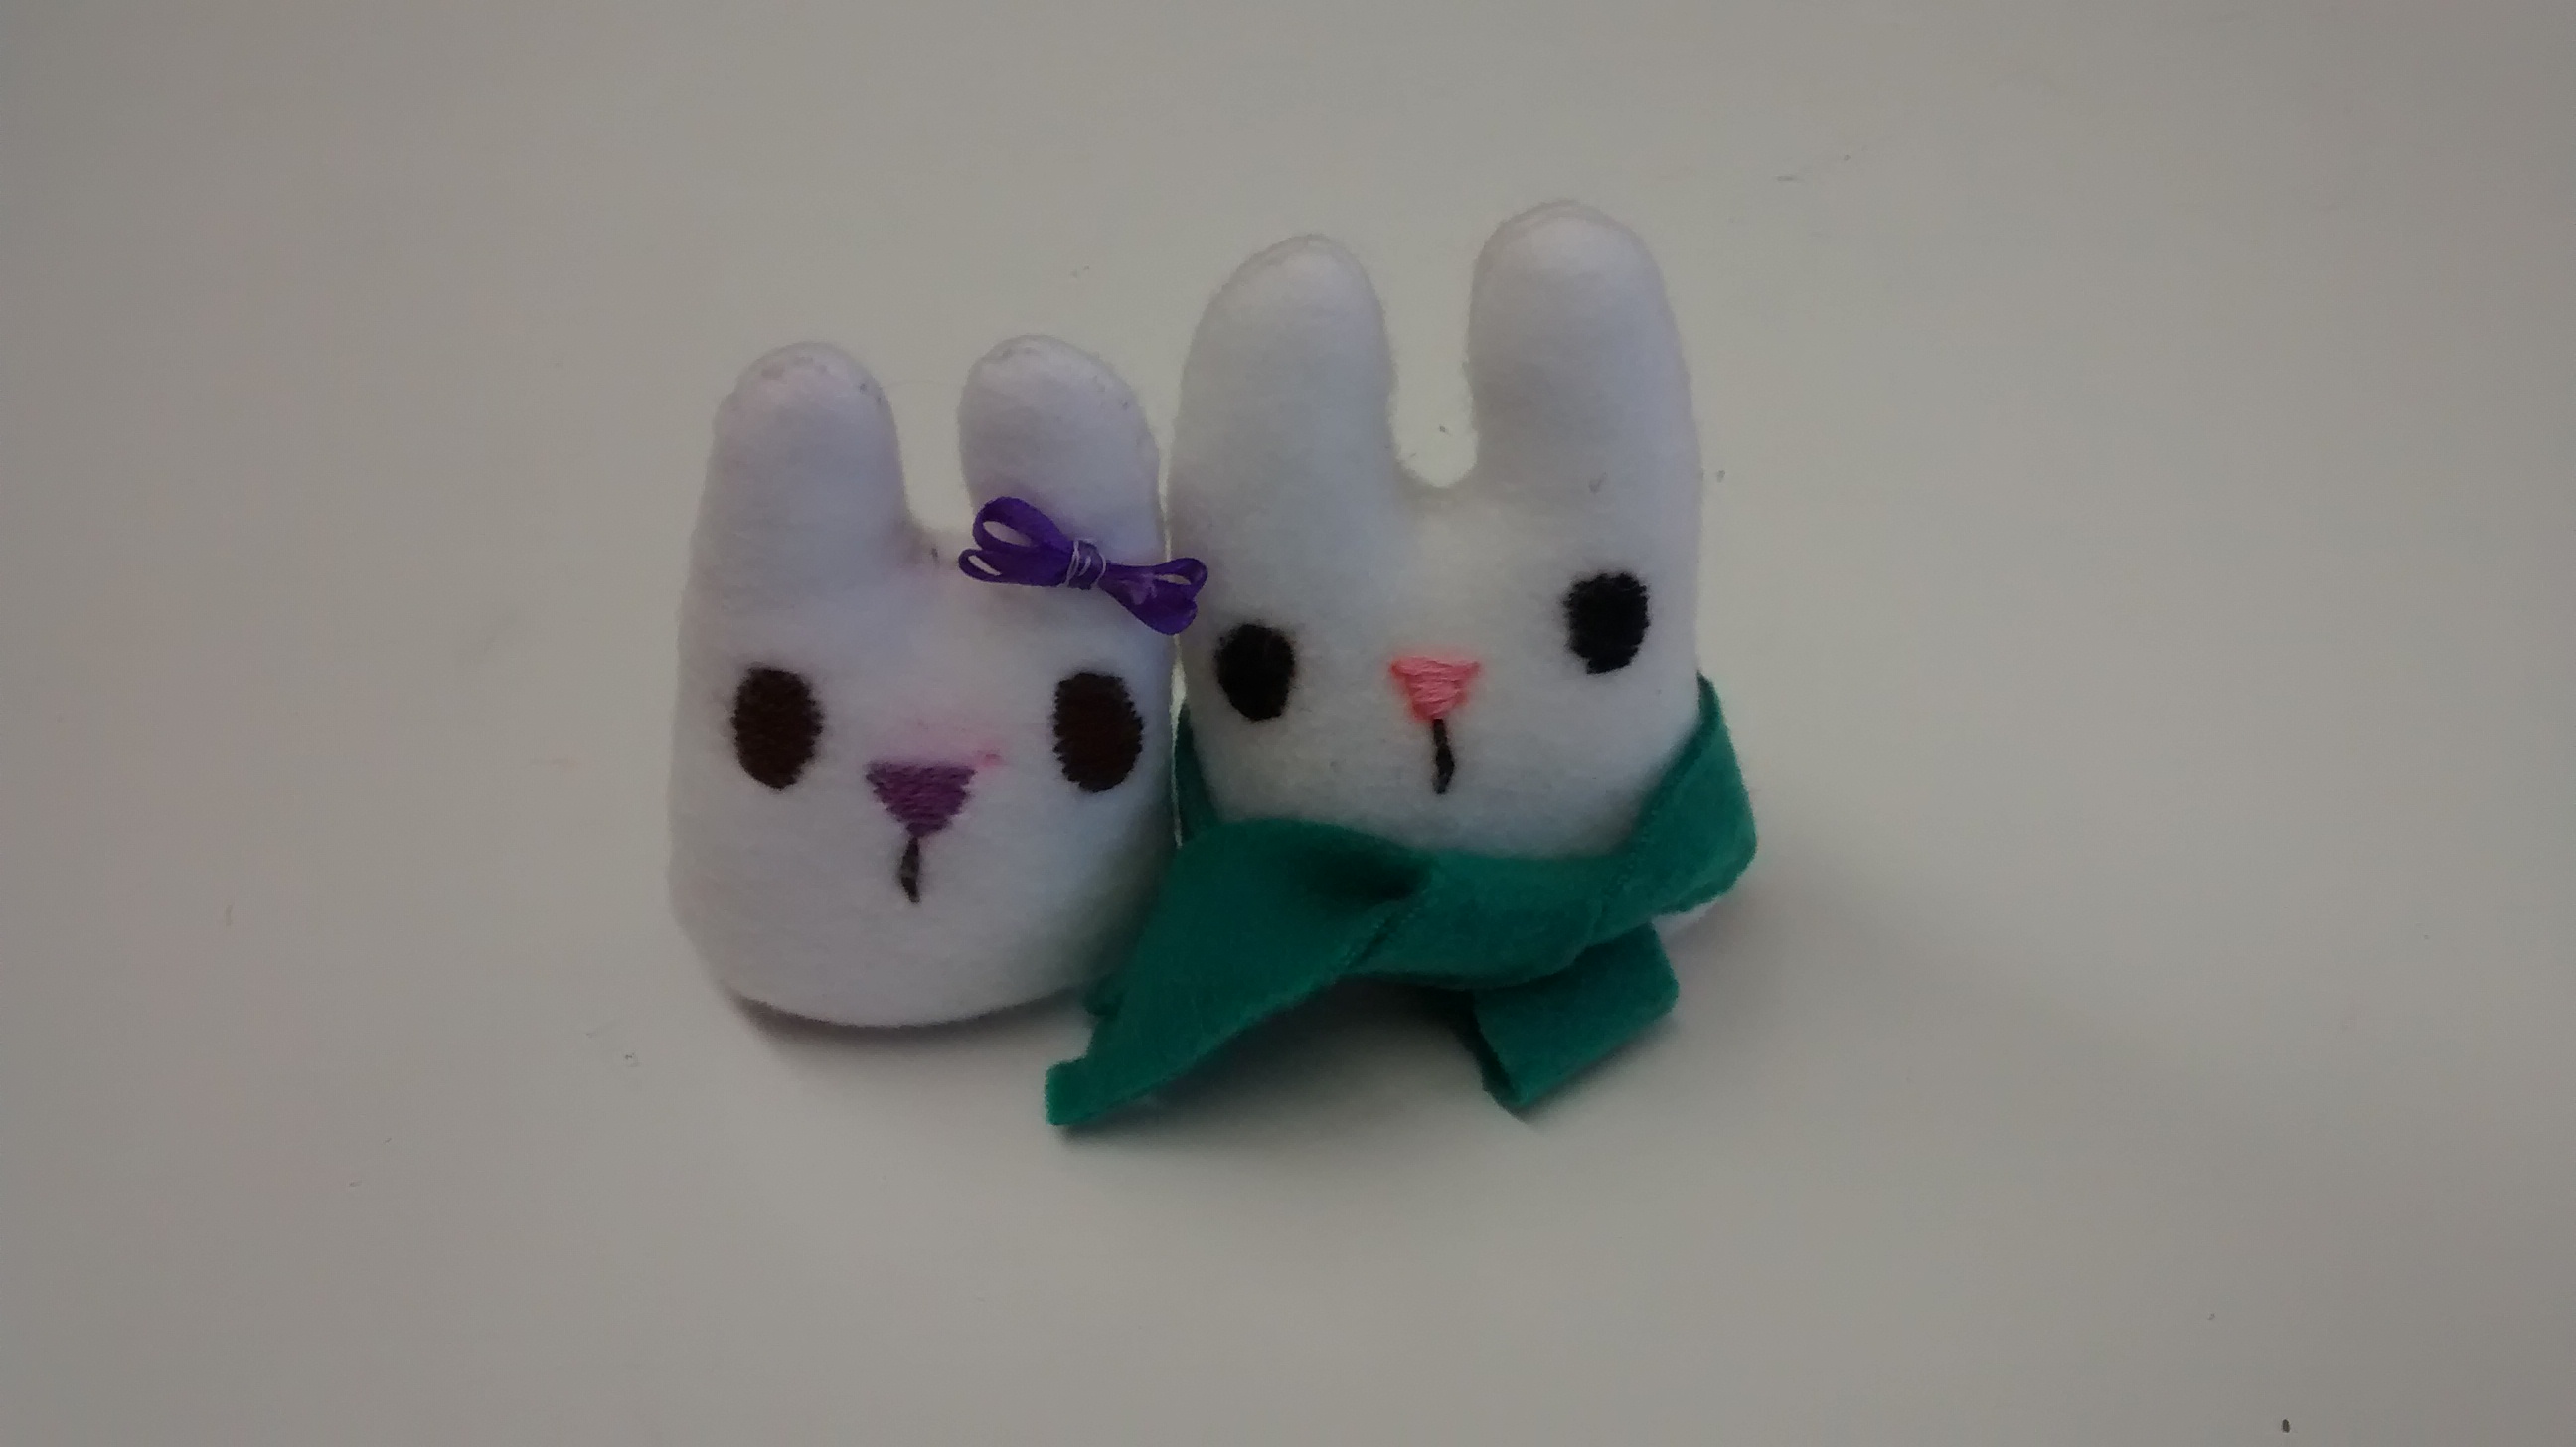
Before I complain about my over-abundant workload, let me explain the Giving Bunny Project. It’s basically a public art installation, with a cute sewing project. You make a bunch of little bunnies, and you hide them in different places for anyone to pick up, and keep forever. I wanted to do something that involved everyone around me, so I think this is a great way to do just that. I promoted this idea to the class, and 4 more people joined my group. Here’s an image of how to make a bunny:

Giving Bunny Process

Giving Bunny Process

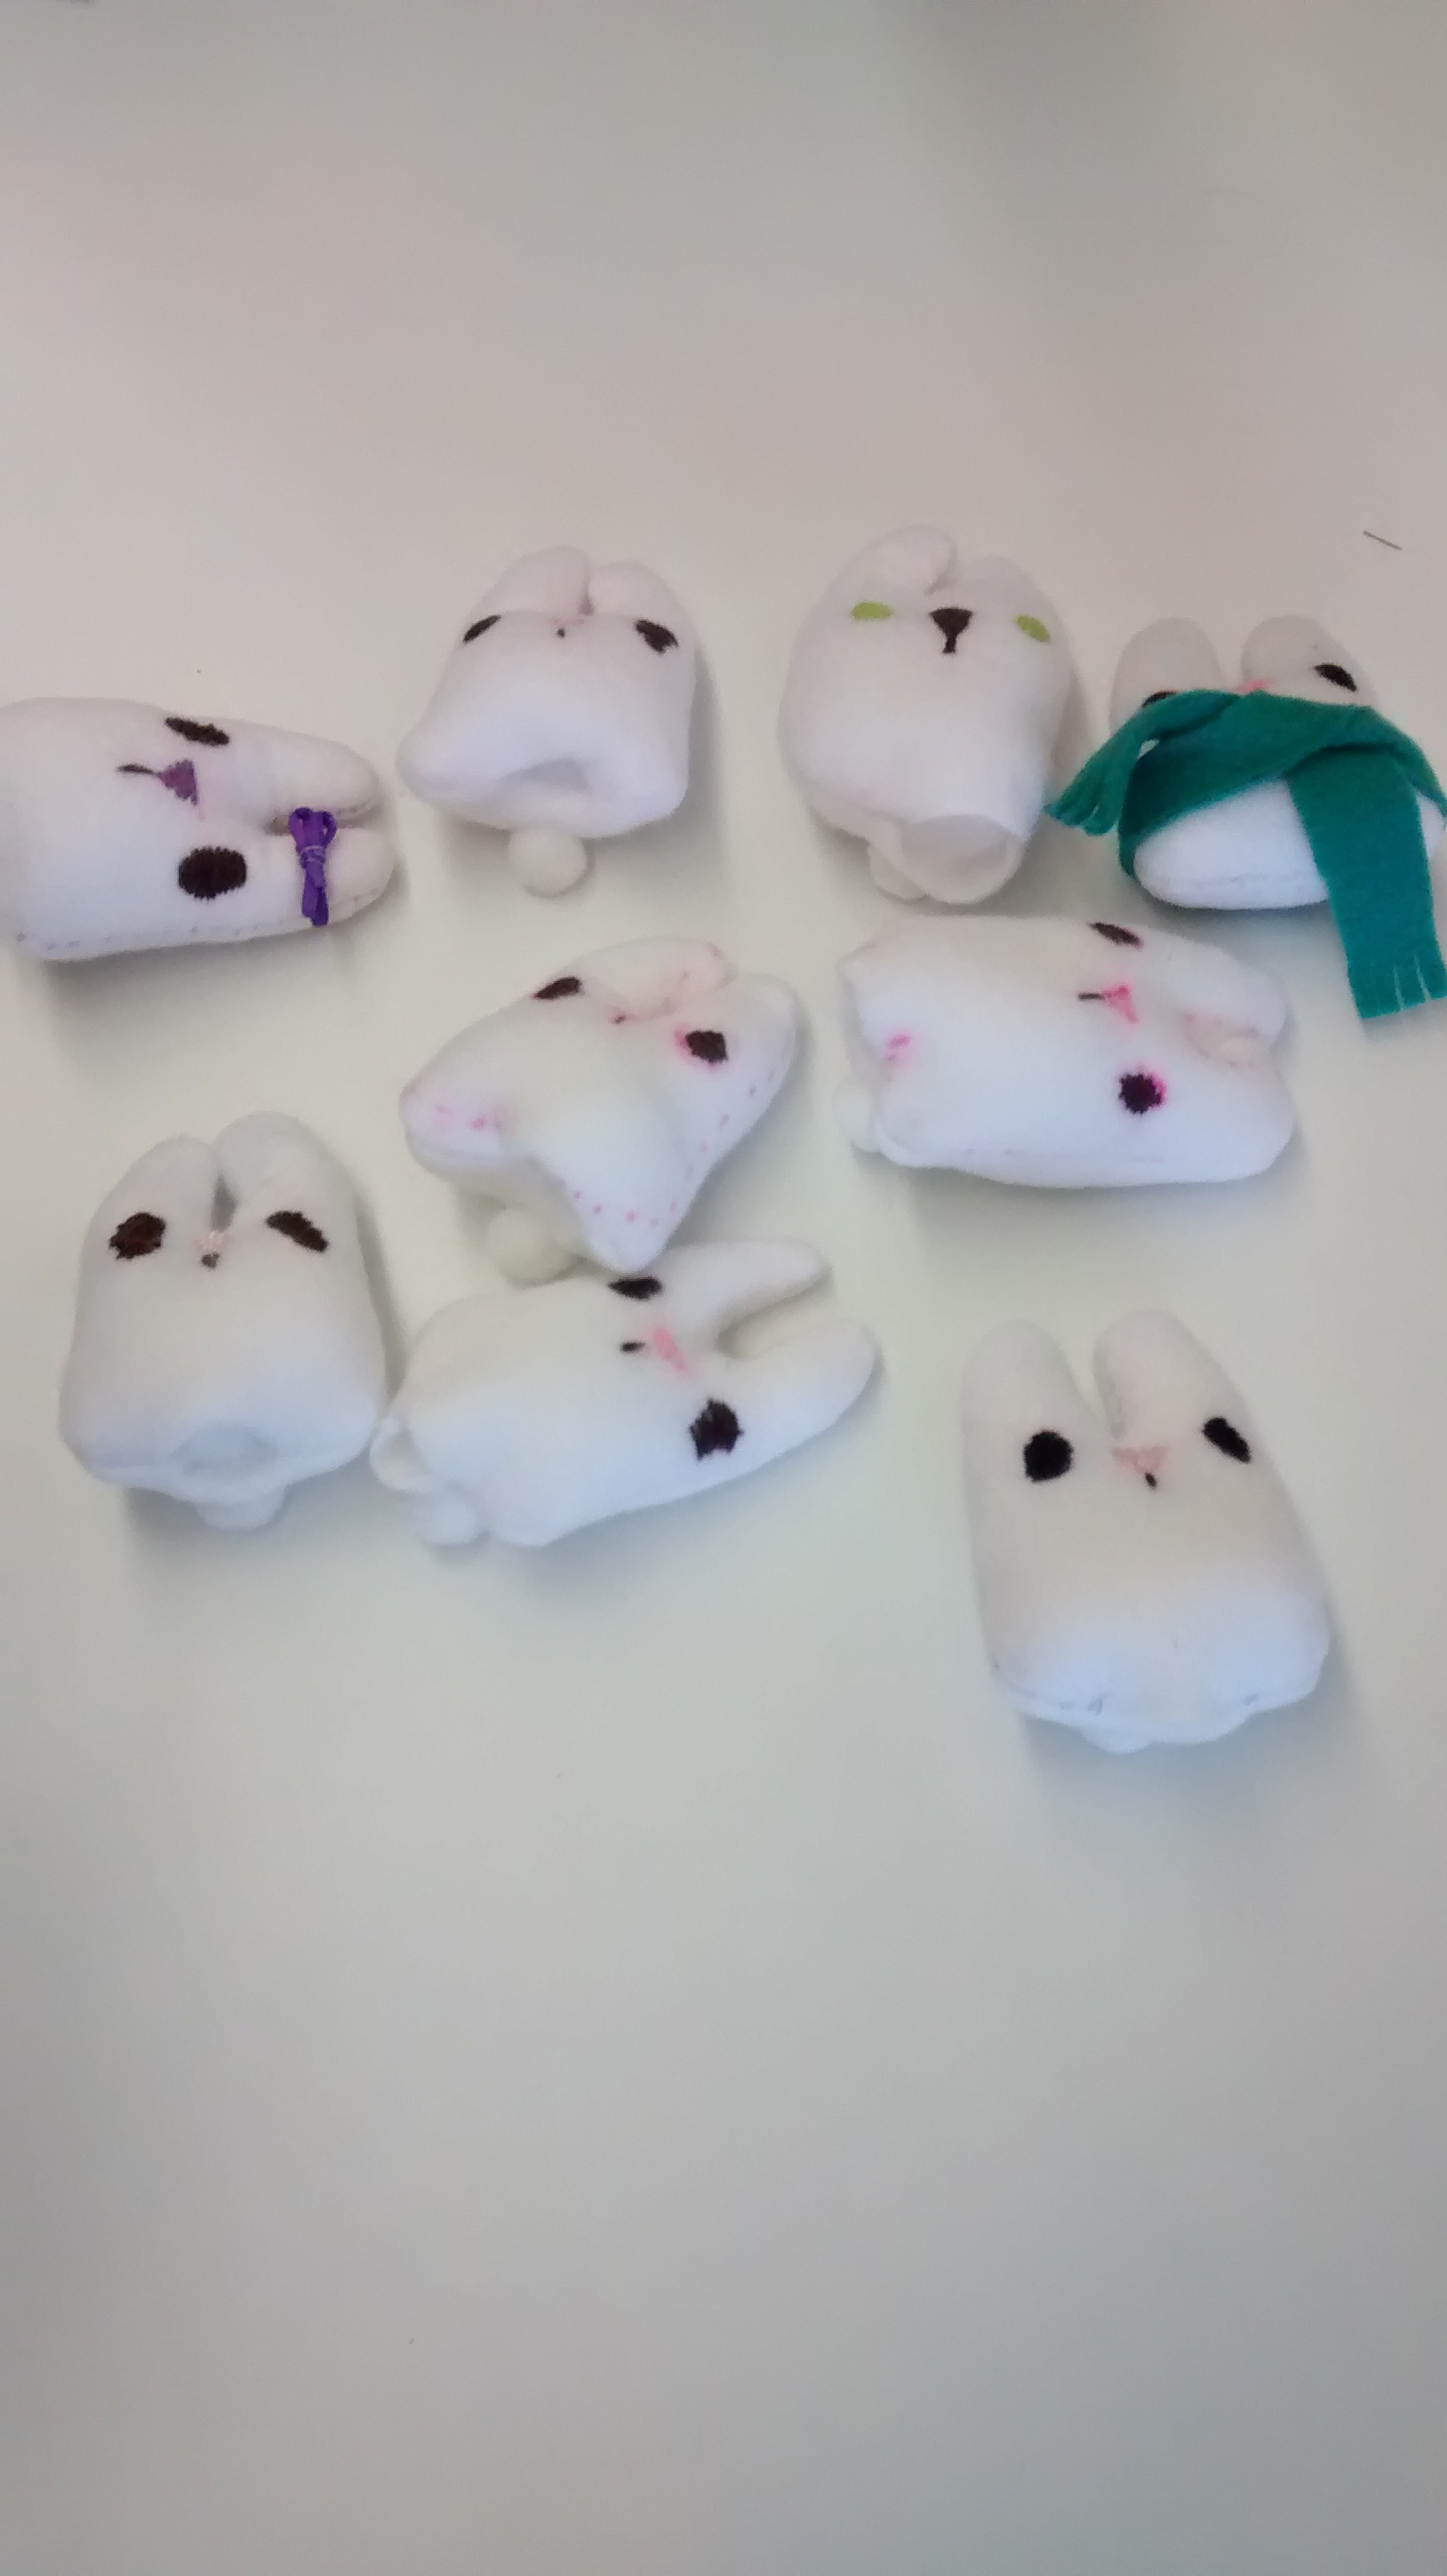
We first trace the outline onto our white fleece, then carefully cut it out along he bold line, and embroider a cute face. Then we sew along the dotted line with the face facing inwards (This was my job) and turn it inside out. Then we stuffed the bunnies, closed them up, and accessorized them! And just FYI, the last bunny with the scarf is the very first bunny that I made. 🙂

So now, onto the complaining. I had given myself a huge workload without meaning to, because I thought that sewing would be a lot faster than it has been. My group and I have been making only 1-3 bunnies per day, which isn’t very much, considering that we want to make a bunch. Also, my quilt isn’t getting finished because I’m arguing with my group-mates about how much I should work on the Giving Bunny Project, or on my quilt.

I consulted Ms. Sauter about what I should do, because neither one of my projects was getting done, and she said that I should let my group-members take over the Giving Bunny Project, and work on my quilt full-time. I decided that this was a good decision, but I would teach them how to use the sewing machine before I left, so that they could sew around the bunnies without me.

I’m really happy to see that my group members are getting better at sewing. When we first embarked on this project, they had no knowledge of sewing, and when you looked at their bunnies… you could tell. I had to teach them how to sew, and now, they’re a lot better at it! Although some bunnies don’t quite resemble bunnies, and some bunnies are a little misshapen (probably because of my sewing machine skills), but most of them are turning out great. I’m really sad to be leaving the group, but frankly I was really stressing over getting my work done, so it takes a huge weight off of my shoulders.

Here are some more pictures of the Giving Bunny Project:

IMG_20150409_114743643 IMG_20150409_114857375

Thanks for reading this, and I hope you check out the Giving Bunny Project on Urban Threads, and the tutorial for the quilt! Both of my projects are really fun, and I hope you try them out too!

Playhouse for the Makerfair

Hello Readers,

I recently started my maker project. My group is making a playhouse for kids under four years of age to play in. We are planning donate to an organization or maybe a school that may want to take it.
We made blueprints for a decent sized playhouse and made a design on Inventor. I honestly never thought I would ever use Inventor again. Back in 7th grade we used it for PLTW and I absolutely hated it, when I was done with the project I thought it would be the last time I would hear of it. I was wrong. But my group members helped me figure out how to use it a little bit and we got the design done!
Then we were ready to work on our prototype which was very fun to do. We cut up cardboard to our measurements and made a little house.
Next, we ordered materials like plywood, paint, and roof shingles. We were also invited to use some wood that was left in the hallway. We took it apart with some drills and put them in a big pile.
After that we started cutting them to fit our measurements and put them together to make the frame of a wall. We have made three wall frames total. That is all we have so far but I think this playhouse will turn out great once it’s done, and I’m very proud of all the progress we’ve made in a short time.
Thanks for reading,
Catalina Gonzalez 8th Period
unnamed window wall Marlene
(p.s. Marlene is not in our group but I wanted to show how she cannot follow directions)

Maker Fair, Here We Come!

If you keep up with this blog, you might have seen my last post all about designing and 3D printing. But now, me (Zoe Taulli) and my same partner Macy Nelms, have taken it a step further. For our schools Make-O-Rama, we are designing and 3D printing a model of part of Congress Ave and the bat bridge.

One big difference between this and our previous one was that we are using a different program to design our buildings. Instead of using Inventor, we used a newer program called TinkerCAD (tinkercad.com). This program has a lot of new advantages. One big one is that it is a lot simpler. Of course, simplicity comes with a few limitations, but I think it is all worth it. It comes with pre-made shapes for you to stretch and twist to your needs. It is also convenient because it is free and you don’t have to download it, which means anyone can use it on any computer (I highly recommend you check it out).

So far in our model we have made two buildings and are currently working on two more. I made the bat bridge and Macy made the Radisson Hotel. We are slowly making our way up Congress. We hope to get to the Frost Bank Tower by the Make-O-Rama, but it is fast approaching.

Finished or not, I am so excited to be showing it off at the fair. I also can’t wait to see everyone else’s brilliant projects. This is our first Maker’s Fair and I can already tell its going to be amazing. Till then, we will continue to work hard and build on!
Screen Shot 2015-04-09 at 1.02.36 PM

Maker project-Xochitl de la cruz

So these past few weeks have been really great. I feel like I’ve learned many thing   from what were building. We are making the one and only children play house which in my opinion is the most amazing thing. At first getting things together was complicated like the measurements, knowing what materials we would use, knowing how we wanted it to look like and things like that were just really hard. After a few days we got the hang of it and started using our time wisely and efficiently to our convenience we had left over materials that we could use to build the walls. We also got to talk to an expert builder he showed us a lot of simple and easy ways to build are house safely, thank you for that. As a group I feel like we have grown and gained knowledge in that area in my perspective we also have learned to share the tasks evenly and work together efficiently. I hope in the end we come out with and amazing and fun play house in which children can pass the time and enjoy themselves.

Maker Project “bird clothes” By: Gisel Perez

For my maker project me and my group are working on bird clothes, accessories and a closet. So far we have finished the closet. I think so far making the closet has been my favorite part even though I do like making bird clothes. While we were making the closet we going t to learn how to use many new tools. For example we got to use the laser cutter, for cutting sides of the closet. We also used the nail gun, witch was pretty scary at first, but once we got used to it, it was a piece of cake, we used it to put the wood together. With these tools we also used many more to make holes, to cut wood ect. With the experience of the tools now we know how to use them if we need to use them for a future project or even outside of school. After we finished building the closet we painted it, made hangers and continued to work on making new clothes and accessories.

bird closet

bird closet 2