The Design Process in our Maker Project

Engineering is the pathway I’m want to go into so I’m doing modules about that pathway and eventually those skills that I was gaining will come in handy in our Maker Project. I have done the engineering module, the mechanical systems module, and I’IMG_20150313_102145-1m currently working on my fifth module, computer and automatic drafting module and many more.
Every module we do are supposed to help you gain a skill that we’ll eventually come in handy especially while were doing are maker project.All of the modules that we have done are fabulous, but I feel like the design process module is the most important and the least talked about.
As I mentioned before that Ms. Sauter (our teacher) looks at our process rather than our product, because the process is the most important part then the product.
First, we identified the steps of the design process. The design process have 5 major steps; identifying your problem, generate concepts, develop a solution, construct and test a prototype, and evaluate solution. The first step, identifying your problem, is basically asking yourself what the problem is and decided whether or not your problem is valid. Generating concepts is just asking yourself what you need and have to solve your problem. Developing a solution is brainstorming (most important part) for an idea that will solve your problem. Constructing and testing a prototype is making the solution that yoimageu decide was the best to solve your problem and making sure it works and if it doesn’t work make changes. Last but not least, evaluating solution is just making sure your problem is solved.
Understanding the design process is really important to know it now that we are working on are maker project.

By:Luz Cruz

Making Knowlegde Relevant Alexis Miller

Do you ever have trouble finding use for projects? Wondering how something so simple is important? Questions like these helped to shape or projects for the Maker Fair. We were challenged to create a relevant project that displays our skills learned in PLTW. My group decided to make a checker board and the challenge was on to find a way to connect it to class.

What is the typical way to make a checkerboard? Wrong! We had to think in not so typical ways to connect a checkerboard to technology. How could I demonstrate my knowledge through a checkerboard? We had previously learned how to use a laser cutter and a 3D printer so I used those in the production process of the board and pieces. My group had to complete an extra module to become better educated in the use of the 3D printer. Once we completed our last module we were ready to begin this semi-complex process of using technology to make a checkerboard set. After we decided to use the laser cutter and 3D printer we had to devide up the assignments by who had mastery in what building process.

Now we had a project, but what would we do with it? This is another very important factor when thinking about making something. Why make it if it has no use? My group decided to donate our project to the library so we could share our work with the whole school and possibly encourage others to become familiar with tools in the maker space. As a whole, my group realized that we had more motivation as we found a purpose for our project. Yes, this included extra steps necessary to make the checkerboard relevant to the PLTW class but it was much more beneficial  to make it relevant to class and use our knowledge.
The first thing I have learned is to show that all things can be relevant you just have to be willing to take an extra step and to think outside of the box. The second thing I have learned from this process it is that you should use as many connections needed to apply your own knowledge and make it relevant.

The Start of the Catapult by Sandy Sanchez

It’s me again!

For my 4th blog post of my 8th grade year. Now we’re well into the 2nd semester. You know what that means? Maker Project time. And I think it’s safe to say that we all are still confused and really don’t know what’s gonna happen at the end. But that isn’t what this post is going to be about. I would like to share with you my experiences so far with the project.

My group is Astrid, Amy, Cindy and myself. We’ve worked together before and are very comfortable with each other. So we decided to do the project together. Now we all like the pathway engineering and decided to do a project based on that. I love engineering and was super excited. But it was really hard coming up with an idea. We all wanted to do with wood construction, but we just didn’t know what. We wanted to do something different from everyone else in the class and also something fun. And I remember just out of nowhere Amy and Astrid both yell out, “Catapult!” And I honestly thought they were joking, but I guess I should have known better!

I remember asking them why in the world would we do a catapult and them saying that it would be so much fun and different from everybody else. That got Cindy onboard. And I was really tempted to say yes that I thought it would be fun, but I just wasn’t sure. Soon they had convinced me and we had our idea:

THE CATAPULT

Client: Athletes who want to practice tennis during off season.

Problem Statement: The athletes can’t practice tennis by themselves during off season. They will need something that will throw the tennis balls for them.

Design Statement: We will design, model, and test a catapult that will throw the balls.

Constraints: Materials, tools, time, budget, be strong, durable, and will satisfy the clients needs.

Deliverables:  We will deliver a working catapult that will throw the tennis balls.

So we had our idea and got the approval! Yay for us! Now we had to start building. But we decided the smartest thing we can do now is build a prototype that will be half the size of our real model. We will make our prototype mostly out of cardboard and make the real model out of plywood. But we realized that we needed to base our design on an actual working catapult. Good thing Astrid had one. So we brought it to class and got to see how it worked and the best ways to build our own. Once we had all our ideas fresh in our heads, we started on the blueprint for the model and the prototype. We decided to laser cut the arms of the catapult since they were one of the only shapes that were too complicated to cut out ourselves. And then we started cutting out the base and the other parts.

Now we are currently finishing up our prototype and changing the measurements as we go. So we’re pretty much right where we should be. Hope it turns out as good as we plan! Here’s a picture of it currently.

Featured image

Humor by Jackelyn Ortega

Making a word out of recycled materials and making it look like what the word means, was a difficult task. Being creative with this module was a challenge. Wanting it to look more unique than the other words other people have created and make it look fun, was our goal. As well as wanting the word to have a specific theme to it, but at the same needing to successfully achieve the requirements was our target.
So to make all of these actually happen we needed to be creative and focused, but of course that wasn’t gonna be the case all the time. We might goof off here and there, but most of the time we tried our best to make that happen. Making the word’s letter was really hard because finding the materials to make it was difficult look for especially at school.

We did eventually find our materials we needed, even though it wasn’t the materials we wanted we had to work with it. After dealing with that problem, we had to come up with a theme to decorate the letters since the other words that had been created using the materials looked pretty lame so we needed to create them more fun looking. Our theme ended up being colorful so we just made each letter look colorful in a different way like for example the “M” we used, we cut up cd’s to give it a different color and look.

So when we finally checked off everything off of our list we were happy with our product we loved the way it looked. We did think about changing something’s, but for the first try we did do good so I’m proud of our product and my group I was with.

The Making in the Maker Space

It is so easy to wonder how things could be better or ask yourself “what if” questions in life. What if this computer’s screen were bigger? What if there was a robot that could help you do chores. (well there kind of already is for example the dishwasher helps you wash the dishes and the washer machine washes your clothes) What if there was a desk chair with drawers under it for your supplies? What if there was a 3D printed chair? Well let me tell you that there could be a chair with drawers, there could be a computer with a bigger screen and there definitely could be a 3D printer.

Right now in my PLTW (Project Lead The way) class the maker project is going on. Many groups are formed with new ideas to make. There are many cool ideas. One group I know is making a dollhouse with dolls included. My group and I decided that we are going to make a 3D printed chair. We are not going to make the whole chair in one piece but in several pieces. Once we have all the pieces we will assemble them in their form and maybe screw them together so it’s more secure.

The upcoming week we are going to be working on the computer designing the chair on computer software. The computer software we will be using is called Tinkercad. We hope it’s pretty easy to do. Once it’s in the computer software we will print the pieces out and hopefully

Computer Software

our chair is successful. I am really excited to see how this project will end up. You never know what you can do until you try. 🙂

Jazmin M.

Biomedical: The Making Of A Prosthetic Leg

image (1)My group and I did a module based on building a prosthetic leg. We had to invent a prosthetic leg so that the person who loosed a leg can replace it with a moving leg and function it like a normal leg, but not your real leg. So we planned out how we were going to make the prosthetic leg, and the way the prosthetic leg was going to look like.

Then my group and I started to construct the prosthetic leg,image so we made it out of cardboard and figured out what size the prosthetic leg was going to be. Once we were done measuring the size of the prosthetic leg we were starting to put the leg together and make it stable so that it was not easy to break.

Finally we were done with making our prosthetic leg. This module came out handy to me because I was able to get better at measuring and constructing things by putting things together. This would help me in the future because I’m going to be using the things I learned from this module to things I will do further on. Starting with my maker faire project in making/constructing a 3D printed chair.

~Jennifer D.A.

Maker Project

Cosmetics has been the finalized decision for our maker project. Creating these organic products will require sometime to figure out, and time is key to this. We wanted to not only learn how to make these products, but to teach others how to as well.

 We decided we wanted to test out the bath bombs, because all we knew about them was they released pretty colors and shiny bubbles when thrown into the tub. We started off by researching online about the ingredients and measurements needed, as well as how the body would be benefiting from the bath bombs. Once we had acquired all the information, we entered a production phase and through the process we discovered ways to improve and individualize our bath bombs from the original formula. This experimentation has helped us understand how to improve our product, and we will continue with the experimentation with not only our bath bombs but lip scrubs and balms as well.


If you were to ask my teammates about their experience to this point, they would agree with me on that making these cosmetics takes patience and precision. You can’t just mix everything randomly then compress it into a ball and expect it to bubble immensely in the water, you need to inform yourself (research), try it out, then find ways to improve it, simple things are more complex than what you think.

 In conclusion we’ve learned how to be efficient workers and how to enhance our products. I’ve enjoyed the making and creativity I’ve put into my maker project and I can’t wait to continue onto the making of our lip balms and scrubs.

Processed with VSCOcam with hb1 preset

~Andrea S.

The Birth Of A Maglev Train

By: Truc Ly

Wonderful news! I’m going to start a new project that you’ll be witnessmaglev training. This time, I haven’t completed the project, in fact, I’m just starting it. So you’ll see the birth of a model Maglev Train that my teammates and I are going to build.

It was a while ago when I did this module about using littleBits,you might have read on the earlier post. But if you didn’t…

train 1

About three or two months ago, I did this module on Computer Science. Our project was to build anything that will function using littleBits. My team decided that we should build a toy train. The train is made of cardboard, and we use the laser engraver to cut it. It was a new and fun project for us. In the end the train was able to light up and “honk”.  This  module stuck with me for a really long time, and I decided to make something even better.

train 2

At first, I came up with a lot of crazy ideas about making a the sculpture of the Earth. Then came to the idea of making a wooden toy train. Sounds easy,but I went through a lot of ideas and thought about using magnets. I always had an interest in them. I love the idea of opposites attract. I knew that this maker project is going to be about a toy train and magnets. The whole product itself is a blur to me. No one knows what exactly I was thinking, I don’t even know myself.

Not until my team talked to Oren. He is this super smart guy in the Maker Space. He is like our second teacher, beside Mrs. Sauter. We talked to him about our idea and he told us about Maglev Train, and how they function. I thought, “Yes, this is exactly I want to build for my Maker Project.”

I have actually liked this type of train since 4th grade. During the STAAR test, I read a passage about Maglev Train. At that time, I never knew what the train was called so I didn’t get to do any further research. It is fate for me to do this project. Since, I’m not able to build this model of Maglev Train yet, but soon enough.

Maglev Train Model Plan

There are many way to make something to levitate. Maglev Trains are the fastest trains on Earth. Many country have already built a track for these super trains to run on.  In America we have already built one from New York to Washington D.C. From what I have seen so far, Maglev Trains are going to be the most relevant transportation in the United States. Maglev Trains don’t get drag by friction, so that’s why they are so fast.

My plan for the train track is to make it out of magnets, facing up with the North pole. The bottom of the train is going to have magnets stuck under facing down with the North Pole. When the same poles meet, they repel eachother. This action will help the train levitate on it own. There will be two beams on the side of the track and the side of the train will have magnets organized  like this.

maglev

This way, the train will keep its balance. I haven’t completed this project yet, so I don’t exactly know if this is going to work, but I hope it will. My goal was to at least have the train levitate. This model is way that the train going to propel itself forward.

Our train is not going to be super cool like some of you might imagine. The train is going look like a box. Just letting you know so you will not be so disappointed. This project is going to be test for me and my teammates,to see if we can actually make something ourselves, without any instruction.

This is a trait of a leader in our school, learning to take risks. This maker project is the going to be the first important risk that I’m going to take. May the odds be ever in my favor.

Maglev. Struggle.

-Pattie A.

Hello! Happy March! As the semester progresses, our project, mind, frustration, questioning and confusion progresses with it too. I finally narrowed down on what I wanted to do for my maker project and I paired up with two other girls and decided on a mini maglev train.

A maglev train is a train that doesn’t exactly require wheels. The train moves because of the magnetic force around it. Because of its circumstances, the train moves as the magnets pass energy from one atmosphere to the next. The faster the energy is moving from one magnetic force to the next, the faster the train moves.

Since we aren’t capable of building a life size train, we decided on doing a mini model. Creating a mini maglev train was not the first idea we had quite in mind. We all agreed on creating a train. The original idea was that it would have a motor and a control. Then, one of my partners thought that would be too hard, so she thought of making it move with magnets (not maglev). As the north rejects the south pole, it would cause a push, and the more force, the stronger the push. We agreed on that idea, then we saw that it wasn’t quite easy. We would need strong magnets and more time to make that possible.

We talked to the makers space Manager and he gave us the idea of a maglev train. One of my partners completely flipped and fell in love. On the other hand, I was quite confused. I had multiple trains in mind and I wasn’t sure how a maglev train functioned. As we YouTubed the train, I saw how interesting it was. I still doubted that it was possible, but as we continued to discuss the situation, we eventually narrowed it down.

hell work

As we brainstormed exactly how it would work, we realized that there were multiple ways to create the train. The first possibility was making a magnetic track and using nitrogen to help the train levitate. I loved the idea. First off, it would be quicker and a lot easier. We wouldn’t have to worry about gluing magnets to the bottom of the train or worry about the weight of the train. To be exact, we wouldn’t have to worry about the train being too heavy for the magnets to levitate. Bingo right? No. One of my partners thought it was too easy, of course. She wanted to start from plain scratch.

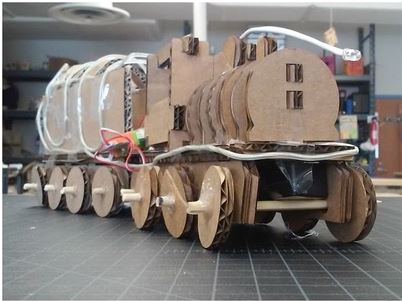
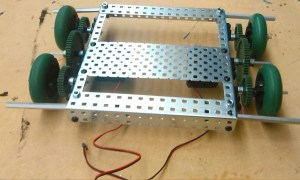
The second way to make the train (the way we chose to do it) was by designing a box, laser cutting it, gluing together, creating a train track, gluing the magnets to the track, placing the magnets underneath the box aka train and making it levitate. I totally disagreed. I thought it was too hard, too much time and if we did end up failing, it would be a complete shame. I was picturing us trying 20 different things and still failing. My partner didn’t let me finish explaining why we shouldn’t do it. “No! We need to get the full experience.” She was right. Even though it was a lot of work to do, it would be fun to see us brainstorming from scratch to creating an entire maglev train.

Everything we do is a risk. There isn’t a thing that is easy. There are shortcuts, but it would be like cheating.

We continued to YouTube mini maglev trains and I started to see how it wasn’t as complicated as I pictured. As we started designing the box and laser cutting it, I realized how everything that seems complex really isn’t. All you have to do is break it down into multiple steps. The more thought out the steps are, the simpler and easier the overall thing/idea is.

I’m slowly starting to get more and more comfortable with the idea and now I am actually really excited to see the train come to life! We don’t have our track built yet, but as soon as we do, we will for sure get started on making out train levitate AND if we do have extra time, we will create a small town for the train to go around with!

Throughout the process of this, I have learned two major things. First, you can never stick with one idea. We originally originally had a globe in mind, then a train and we ended up working with a maglev train. As you think of your idea you come up with many others and you just can’t park with one. Second, don’t be scared of complexity. Everything is complex, we just tend to overlook the simple stuff in which we identify as simple. I learned to stop being scared of challenges and go with it!
I am so excited to see where we end up!

Yet Another Adventure (by Avery)

Yet Another Adventure an amusing blog post by Avery

Oh no.

What do I write about?

I can’t really say much, as not much has been going on, at all.

Well, I’ve started my Maker Project

Ah yes, I’ve started my Maker Project. That’s certainly something to talk about. And so far, the whole task has sailed about as smoothly as the Titanic.

It all started when I had a sudden idea for something great. I was listening to The Logical Song and I thought, oh hey, this would look great animated! And it occurred to me that I could animate it. It also occurred to me, later, that I did not, a, own this song, and b, play any instruments. I could use a song from the public domain (no, all obscure 1920s songs) or make one myself (no, I would have to do that a capella).

So I gave up on that idea. It didn’t seem very logical in the first place, anyways (cue mass applause). Fast forward to math class, where I was briefly daydreaming about this completely random thing I made up about three years ago.

photo

I don’t really remember when I thought of this idea in the first place, but the idea was that there was this port town where all these mutants and animal hybrids and stuff lived. Of course, this sounds like precisely the thing I would make when I was in fifth grade.

At home I unearthed the planning sheet and looked it over. It actually looked like a good idea, one that I could pull off. I wouldn’t have to use music.

And then I realized that animating people would be hard. Really, really hard. Not that I’ve ever animated anyone, but I assume with all of our moving parts, humans would be quite difficult to animate.

Flashback to the summer, where I would listen to Here Come the ABC’s on a loop. Eventually, I started a comic on letters with personalities.

blogger-image--833986304

That was the very first panel. I went on to create more.

I think I was sitting around and suddenly,

ohyes

And so this was my plan. It took a while for my application to be accepted, and for me to find a way to animate this, but hey, I’m on a roll.