The Opportunities ofGTT

By: Selena Antunez, Luz Cruz, and Angelica Eduardo

GTT (PLTW) is a really cool class. GTT stands for Gateway To Technology (PLTW  stands for Project Lead The Way). This class is full of really cool opportunities and experiences. In this class we have the opportunities to build, work with tools, work with mechanical systems and robots, learn about media tech, and 3D print things. It’s really fun, and we know it is a great privilege to have this class, so we will take advantage of it!

Mechanical systems are things that make life really easier. In one of our modules we had to build mechanical systems. We used gears to build different mechanical systems. Modules are some projects our teacher has us do that are supposed to help us learn about different pathways. Pathways are something we are supposed to take in high school. We do modules in 8th so we can decide what pathway we want to take in high school. Mechanical systems are things that make life easier by reducing the amount of work you have to do.


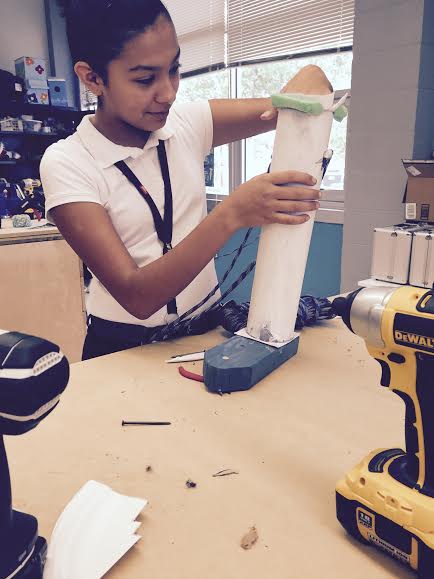
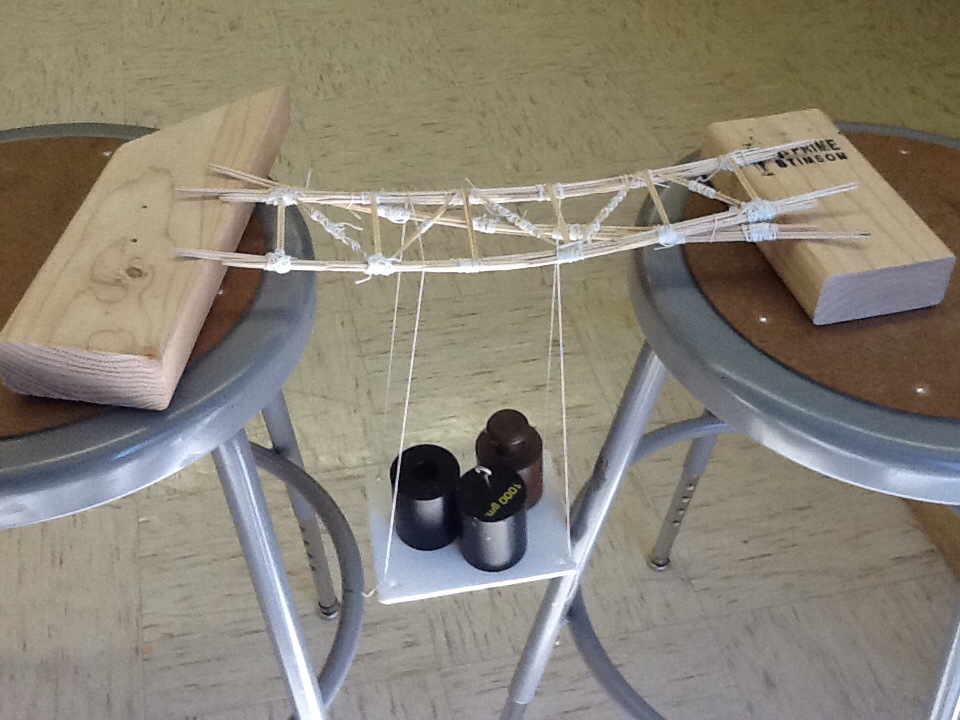
One of the things that we do is work with tools and build objects. One of the fun tools that we are able to use are saws. We are going to use saws to make birdhouses. Many people in our class are enjoying this little project, and we’re most likely going to choose as our next module. The first thing that we had to do was make a bridge out of toothpicks, liquid glue, and string. When you think about it, its a really hard project to do if you can’t use tape or super glue. When we finished it we had to test it to see who’s bridge was stronger in the competition. Our bridge held 4,095.5 grams. After that Ms. Sauter, our PLTW teacher, will hang the bridges on a string by strongest to weakest.

Another project we did was to create a speaker for an iPhone. This project was supposed to teach us about the design process. In this module we were not graded on our final product, we were graded on how we used the design process.


Overall this class is really fun and we get to work on awesome project that we call modules, we also work with cool people that are really fun. These modules are full of new experiences and new skills that will eventually come in handy one day or another. I’ll say that this is one of my favorite classes just because of the amazing people in this class and the fun projects that we get to do. This class is full of opportunities that we won’t get an opportunity to do anywhere else.

Improving With Risk by: Lily Myers

So I have recently completed the prosthetics module challenge 2 in which my group and I design and then made a prototype lower leg prosthetic. In this module I learned something super important and something I will keep wit me for the rest of my life, you always can make a product better and so you should not be too attached to your first idea/design and you have to take a risk. In the prosthetic we had a simple leg made of 2 toilet paper tubes with a noodle cushion and a cushion for the knee with a thin foot directly underneath. Although this was was a good design we could make it better and and so although it was very difficult we took the risk and added more cushions to the ankle area and then more to the top. Then we were going to add a rubberband to connect the knee. Although it was a  good design we improved it by adding the plastic brace at the top and string to secure it along with more cotton balls.

If we had not let go of our first design and took the risk of improvement although we might of failed we would not have had such an successful prosthetic leg. This just shows that it is so so important to not be so attached to your original plan because if there is improvement you should go for it even if it is risky. If  inventors and engineers never took risk to improvement or tried to make it better then we would be slower on the rate of technology and invention advancements. In-fact a huge and successful inventor named Steve Jobs once said: “ Sometimes when you innovate, you make mistakes. Its best to admit them quickly. It is best to admit them quickly, get on with improving your their invitations”

This quote means that you should take risk because if you fail during the risk you can just only go up from there. So now through any of the PLTW work you can always improve on new designs even if it means riskiness. I will make sure in all my work throughout PLTW and in future for designing I will make sure I am always trying to make my design better no matter the risk because if I don’t take risk I won’t get anywhere thus no improvement.

Improving As We Go

Self Improvement

Claudia Luong

We all have those little things we dislike about ourselves. Whether it’s our physical features of just habits. Personally, I have a terrible habit of not asking for help and think I’m stupid if I do. This leads to me being scared of projects or homework and I refuse to do them, until I realize that I really NEED to do it. In PLTW, we develop a lot of skills. Whether it’s learning how to saw, what to do in the dark room, or how to build a bridge out of toothpicks, string, and glue there’s more skills than that. Sometimes it’s more than that. Working together, common sense, or time management. Over the past 2-3 months of school, I’ve gotten so much closer to people who I don’t even talk to to and have gotten to know how they work. Knowing these things, I know where to put myself. If I know one of my partners doesn’t like a lot of work, I will try to help and push them to do an equal part of the job.

I gained so much common sense when building the bridge. At first I was thinking, how is toothpicks, string, and glue supposed to carry a certain number of grams. We made a technical drawing which is just based on the measurements and we went for it, but when we started building we came up with more ideas over more ideas. I think that we should’ve planned out more before we started building. We felt pressured over the little time, but all we needed to do is just brainstorm a little more and not go with the 1st idea. I felt like we could’ve used our common sense a little more, but we learned and we have worked on common sense on our future moduels.


The Bio-Medical moduele was very interesting and we developed the skill of asking questions and just sit there being lost. We had to imagine what medicine would be like in the far future. In 50 years, anything could happen. Look at technology today. There are an outrageous number of things out there. On the assignment, we saw that we had to make an interactive, but with an app. That’s the part that we missed or didn’t understand. So we made a full. handmade game. Doing this, we didn’t follow the instructions so Ms. Sauter notified us on the app. If we just asked Ms. Sauter about the app or if we didn’t understand the assignment, we should’ve asked instead of going for it, again.


We will probably make these mistakes over and over again, but it’s a good thing that I notice and am aware what am I doing.

The ARS Makerspacer!

Featured image

In the picture above, we can see a few ARS STARS working on their most recent module.

How is the ARS Makerspace going?:

WOW! We are almost done with the first two six weeks of this school year. I look back at the beginning of the first few days of school and I remember telling myself that I was not going to be capable of doing all the modules and products we had been assigned. Now that I have some experience, I know that I am capable of doing modules under 2 weeks. Overall, I really enjoy our ARS Makerspace. Not only does it allows us to have a very unique experience, it also impacts our future decisions when selecting our pathway.

What the ARS Makerspace is all about?

If you were ever to walk into our makerspace, you would see most of us working on different projects. Most of all, you would see every single one of us focus and always tackling our goals. Never would you walk in and see a STAR messing around or being unsafe in our makerspace environment. In other words, the Makerspace is a work hard, be safe, challenging zone. In order for someone to be able to be productive in that class, they have to go out of their comfort zone, be willing to face challenges, and always accept failure as an option.

Featured imageFeatured image

Here on the left picture we have Darby working on a bridge. To the right, we have Jacinda working on a model for a prosthetic leg.

How has the Makerspace helped me?

The ARS Makerspace has helped me expand my knowledge in media technology, biomedical science, and engineering. Also, I have learned to view a couple of real live examples of what a professional in that specific field goes through. Overall, I have learned to picture how the pathways we take can help us in our future careers.

Pros & Cons about our Makerspace. 

Pros:

Cons:

  • Something I really like about this class is that we don’t all have to do the same module.
  • With this being said, a few of us do eventually fall behind, or get ahead. We never seem to be going at the same pace.
  • We are allowed to let our creativity go crazy!
  • We can eventually face a few challenges based on the difficulty of our product.
  • We get to select our group members for our projects based on our interest.
  • We can face conflicts such as getting off-task and eventually getting off schedule.

 By: Yoselin R. 

Problem Project

I recently completed a project in class, it was the first engineering module. I did it with my group of Zoe, Isabella, and Cloa. The first engineering module is to design a bridge with only toothpicks and glue and string. We had to use Elmer’s glue instead of hot glue and we didn’t have a lot of time. We tied all the joints of the toothpicks and string to keep it strong. We had our design a laid out and the first part was going very well until…

The first problem arose when we found that toothpicks started to disappear and then we found out that Cloa likes to chew toothpicks, so we had to keep her from doing that. The glue wasn’t drying fast enough to make the bridge so we decided to use a hair dryer, to make it dry faster and we succeeded in blowing pieces of bridge everywhere, that was our second problem. We started to run out of time to make the top of the bridge so we just glued the top support beam to the bottom structure we had made and decided to go with that, trouble number three. So when it was finally dry and all put together. We went to go weigh our bridge the first problem with that was the span of the space the bridge had to cross was 16” and we made our bridge exactly 16”. Our bridge also looked pretty flimsy and Ms.Sauter told us it probably wouldn’t hold much. So I started putting the weights on it when I got 1000g I was like, “okay going to break now,” but I decided to keep going and try 2000g.. Then I got 3000g and I was just like, “oh my goodness don’t break on me,” I was so scared. I finally get to 4500g and I start to hear creaking, the flimsy little bridge my group made just held for thousand 4500g, I was very happy. I learnt that you need to manage your time well and if you don’t give up everything will work out in the end.

By Zoë Magee

imageimage

Working With Vex Robotic Kits By: Truc

Mechanism plays a big part in Engineer pathway. In the Makerspace, we love to design and create new things. Engineering is also like that, designing and building. It’s simple as that, but with mechanism, is not so simple as you think.

But first, let’s get to know mechanisms.

What is mechanism?

Mechanisms are the parts of a machine, which contains two are more pieces arranged so that the motion of one compels the motion of another. Change the type, direction, speed, and amount of torque of movement.

  • Type of Movement
      • Rotary
      • Reciprocating
      • Oscillating
      • Linear
  • Direction in Gears
      • Meshed gears in a grain train always turn in opposite direction.
      • The flow of power is reversible only if you can make the input shaft turn by the output shaft.
  • Speed  (Show by Gear Ratios)
      • If the output gear is larger than the input gear the speed will decrease.
      • If the output gear is smaller than the input gear the speed will increase.
  • Torque
    • A push or pull in a circular direction.
    • If the output gear is larger than the input gear the torque will increase.
    • If the output gear is smaller than the input gear the torque will decrease.

The ideas seem simple, but when you actually try to imply this into The Vex Robotic Kits, it’s hard. These are some things that we can build using these tools. A Simple gear train, bevel gear, differential gear, worm and wheel, lead screw, rack and pinion, universal joint, chain drive, belt drive, crank and slider, crank and follower. Below is an example of a belt drive. I built it for my first challenge in this mechanism module. I was frustrated at first, because I didn’t know what to use, but eventually I got the hang of it.

Featured image

Building A 3 Skewers Rotary

The goal of this challenge is to turn three separate skewers over a flame at one time using mechanism. We planned to use the simple gear train with idler, to complete this task. But first we need to have the materials.

Materials you will need…

Featured image

Spiky screws

Featured image

Screws

Featured image

Universal Joints

Featured image

Metal Pallets

Featured image

Gears

Featured image

Metal Sticks

Screws, universal joint, metal pallets, gears, and metal sticks.

First, we connected the metal pallets with the universal joints and spiky screws, to build and basic foundation.

Featured imageFeatured imageFeatured imageFeatured image

Second, you’ll put the gear into the metal stick and the metal pallet. Make sure to leave some space to put in screws and a spacer. Note that you need one input so put a handle into one of the gear, that will be your driven. The last gear will be your drive. When the gears on the pallet, be sure that the the gear are not overlapping nor too far apart. They have to be just right, touching each other.

Lastly, make sure to put all the screws to where it supposes to be BEFORE you screwing it in.

Featured imageFeatured imageFeatured image

Featured imageFeatured imageFeatured image

Featured imageFeatured image

You notice that all the gears are equal to each other, so the gear ratio will be 1:1. This mechanism doesn’t increase the amount of torque not speed. The only thing that it does is the motion of rotary on all three skewers. Here is a short video on how it function.

Our creativity in the Media World By:Raymya

Today I’m going to talk about Media Tech. Before I had to do a series of challenges Media Tech,“(Media Technology)” to me, was just making movies. As I had to do this module my understanding of media tech has grown.

Media Tech is not just making movies. “It’s language arts, media, art, and theatre art,” says a junior in the Media Tech pathway. It’s these things because you have to know how to act to play the parts in these movies. You also have to write a script and know how to make it to where it doesn’t exceed certain time limits, but make it to where it’s also interesting. You also have to create settings or find the perfect setting to go with the theme or moral in your movies.


“Media Tech is hard work,” says another junior in the pathway. They have to make sure they meet deadlines, do specific prompt, know how to work with cameras, and even learn how to use editing softwares; to edit the sounds quality, scene length, and placement of the scenes. Just like the juniors my group had to use an editing software, and let me tell you it was beyond difficult. Not only did we need to take out pauses we have to create credits at the end and enhance or presentation by including subtitles of our prompt.


For this project we had to come up with our own technology that could be of use not only to use but our peers and the outside world. So we came up with a phone that would have good voice recording quality, and would detect our moods by voice tone; and it would even give you a picture of how your friend looked when you were on the phone. This invention would help the public because it would allow you to know your friends mood, to know if its the right time to bother them with good news, bad news, or to just bother the.

These modules not only give us a better understanding in media tech but they also allow us to learn, and maybe even use what we learn in real life situations or to learn when we are in college. This module makes it easier for us to know what we want to do when were older, because there’s always that hesitation or lack of knowledge to what exactly were interested in doing.

Maya Angelou once said, “I did then what I knew how to. Now that I know better, I do better.”

My media Tech invention design brief, technical drawing, and design matrix: This was the design process we used to come up with a technology that would be beneficial to us and the people around us. We created a phone that could detect the moods of the person you were calling or texting, and it would send you a voice message of what their emotion is.  It also had great voice recording.

My media Tech invention design brief, technical drawing, and design matrix: This was the design process we used to come up with a technology that would be beneficial to us and the people around us. We created a phone that could detect the moods of the person you were calling or texting, and it would send you a voice message of what their emotion is. It also had great voice recording.

Pinhole Camera

In class, for our last module, Intro to Photography, we made a pinhole camera. This was part of the pathway, Media Teach. The camera is still a work in progress, but it’s the best camera so far in our class. We had a few flaws but we have improved it, all we need to do is take a really good picture with it, and we plan on taking a picture of a big red button.

We started by getting a soda can, but realized how difficult it would be to use it and cut it. So instead, we delayed the project until we finally got a pringles can, which was much easier and practical in the long run. First, to make the pinhole camera we had to research what it was and how it worked. We figured out that a pinhole camera works by light coming through a small hole and imprinting the image on the film inside. For this to work the inside of the camera had to be completely pitch black.

The actual building process started when we got the pringles can. We started putting black paper around the inside the can. Then we cut a big hole at the bottom of the can. After that we add more paper to the can.  We added the paper on the lid and at the bottom of the can. We had many attempts on taking the pictures and we still haven’t taken one perfect picture. On the first picture, we let light come in for too long and the picture came out with different things on it. On the second picture, we let light come in for a short amount of time and there was nothing on the picture.

In conclusion the camera was a work in progress Ms.Sauter (our teacher) told our group it was the best camera she had seen so far but we messed up on our picture and when she said/asked us if we wanted to keep working on it to make it better and to take the perfect picture because we want to feel good about our work. Our group worked on this camera and tried our hardest and sometimes we got frustrated but we did not give up and we feel very proud of ourselves that we have accomplished something and that we did an amazing job on it.When we worked on this camera  we put on straight focused faces but we also had fun making the camera  and we each did our own parts.


-Monserrat, Nayeli, Yazmeen, and Elayna

My Individual Blog

My blog is going to be about the projects that we do around class. Such as the media technology modules that we do like, photography & blogging (Like what I am doing now). Biomedical modules that include making prosthetics & computer simulations. And, lastly the engineering modules which are probably the most popular, they include projects like making bridges out of toothpicks and building bird houses.


The modules I have done are media tech and engineering. I have done the toothpick bridge, blogging, and filmed a small video about the future technologies. My thoughts on these projects are that they show you different ways of seeing the way things will be in the future or how hard it is to build simple things.


The toothpick bridge helped me understand that simple things like gluing toothpicks together and making them hold things down. That looked very easy and simple, like it was a piece of cake. But, there was a huge struggle. with building this simple little bridge. By the way, our bridge held on to lots of weight, more than we thought.


Filming a short video about the futures technologies was actually pretty cool. I loved the part where you got to choose what new technology to make, that will help the human race more than what we have got now. Out of all the projects this was my absolute favorite because it showed me what to kind of expect in the future.


And, lastly with the blogging. Writing, typing, etc. is what I enjoy to do. I just love talking and typing about what happens around me or what my thoughts are on certain things. Blogging helps me express what I want to say and without blogging everything I think or see will be trapped inside me and never let out. So, blogging is really fun and very needed in my life.

Candace Castillo

How Pathways Affect Our Future

How will they affect us in the future? There are so many ideas, so many things to think about, so many questions, but not very many answers. What if there will be cars where you don’t even have to drive them? They drive for you while you get to sit back and relax.  You just program your car to go to your destination, and the car will use the satellite maps that GPS’s use to find the correct route. What if we used holograms to watch a tv show instead of a tv? What if you took a daily pill, and if you were sick or something in your body wasn’t right, it could alert your doctors? There are so many great things that could happen in the future! We just have to keep questioning, evolving, and expanding the tools that we have.

For example, for Biomed there are Computer Simulations that help test theories, experiment prototypes and track progress. Prosthetics are also important because without them how would we be able to test how we would    be in your daily life without an arm, hand or leg? Without a hand, how would we write? If we lost a leg, would we have to be in a wheelchair all our life? Without these inventions that Biomed allows us to create our lives would be much more harder. The future holds a lot of opportunities for Bio-Med, and we can help make that happen! We can help evolve the future and make it better.

For Media Tech, photography can evolve into wearing glasses that take pictures for you or maybe x-ray glasses that shows you the x-ray of a person. Maybe, instead of photo editing and waiting to edit the picture when it is done, you could edit the photo while you are taking the picture. A lot of things can change with photography in the future and we are here to enjoy the evolving future of Media Technology.

Now for engineering, honestly this can be anything you wish for. Such as, a holograms or new cars. Engineering is probably the most important out of all because it is basically in everything and you need it to create things. What would be a plane without the engineering in it? What would our phones be without engineering? How would we be able to do all these projects without the engineering in them or the engineering that we need? The future depends on engineering, without it, this generation would never be the same. Each pathway there is you will find a way to change the future.

Candace, Ginger, & Elissa