Prosthetics

Prosthetics

By Savannah Wallace

The Prosthetics module has been one of my favorite so far.

The first challenge was to go five minutes without a leg, and it was very very hard. I really enjoyed getting to do that though, because though it was unpleasant, it really was a great experience; getting to see what many people go through and struggle with.

My group members and I hopped around for fifteen minutes, then we wrote about how we felt and what happened. The following is my entry: “When I had to go five minutes

without a leg, it felt very funny. My leg got numb from being held up for so long. It was very uncomfortable. I also felt like people were looking at me differently and it made me feel different, like I wasn’t like them, that I wasn’t as good as them.”

     Challenge two was to make a prosthetic leg. We thought about all the different factors, and what we could do to make this prosthetic leg something that someone would actually want to use. Although this was obviously a hypothetical situation and no one would actually be using the leg, we still thought of the entire project in the mindset that someone would be using it. First, we scavenged for materials. We found a very thick and sturdy paper cylinder, a piece of wood, sturdy string, bubble wrap, and duct tape. Next, we began to assemble. We drilled holes into the cylinder, which would be the main part of the leg, for the string. We then used wood glue to glue the small piece of wood, the foot, to the paper cylinder, the leg. Next we ran the rope through the holes of the leg, which would hold it in place around the user. Then we decided how much bubble wrap, padding, we would need. We rolled up the padding and placed it around the top of the leg, then placed some on the inside, and used the duct tape to secure the padding in place. Lastly, we tried the prosthetic leg out. We had one of our group members try the leg out, and we tried out the different ways to tie it, so we could make an educated decision on what would be the best way to tie it onto the user.

Hope

For challenge one of materials we had to make a wiki on a material that you use for making things. Some of the wiki’s that were already done had materials like: wood, plywood, steel, aluminum, cork, copper, and gold. As we cms_file_35152689_thumblooked at all the wiki’s I started to wonder what in the world were we going to use for our material, they have already done everything from wood to gold. While I am thinking I start twirling a plastic pen around my fingers, that’s it I think we could do plastic for our material. We found out that plastics are made from oil and oil is a carbon-rich raw mat erial, and plastics are large carbon-containing cms_file_35152737_thumbcompounds. Also that plastic can be molded into an almost infinite variety of shapes and that plastic doesn’t react chemically with most other substances, so it doesn’t decay. It can also be melted down and recycled to make other plastic things.


For challenge two of materials we had to pick a word from the character list on the materials page under the paragraph of  instructions for challenge two. The word also had to be made out of upcycled materials, when something is upcycled it is made out of materials that have been put in the recycling or someone is ready to throw it away. For our upcycled materials we decided we wanted to use styrofoam, wood and cardboard. Before we actually picked our material we had to pick a word from: bravery, love/kindness, grit, gratitude, integrity, curiosity, cooperation, open-mindedness, adaptability, fairness/justice, empathy, forgiveness, loyalty, creativity, optimism/hope, zest, grace, commitment, spirituality, intellectualism, prudence/discretion, appreciation of Beauty, entrepreneurship, wisdom, advocacy, and image
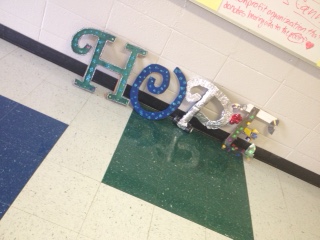
humor. We decided to do hope because we thought it was a powerful but short word and no one had done it yet. We decided to make the H styrofoam, the O and P out of wood and the E out of cardboard. After we used a band-saw, sander, box cutter, scroll saw, and a handsaw we had all of our letters cut out. Then we decided to decorate with pink and orange spray paint, our word Hope was complete.

I had loads of fun using the tools in the makerspace and making the letters out of upcycled materials. This was another one of my favorite modules because I got to use my hand hands, the spray painting was especially fun. I want to do more engineering modules.


By: Zoë Magee

Materials~ Hope Gisel Perez

image

For my last module I did the Engineering, Construction and fabrication basics Materials. For this module we got to pick from a list of character traits to make the letters 3D out of different materials. Me and my group chose “Hope” as the word. We also knew that we wanted to make it look different and cool. For the materials we used wood, cardboard, and styrofoam. For decorating we just used caned paint pink and orange. When we are done with these words we can put these anywhere around the school. When you instantly walk in the school you can see these mostly everywhere. These are inspiring colorfull words that you can just read when you’re walking to class or out of class. These words can also make you feel better or cheer you up. I think these words look really good and are  really good to just be everywhere at school.

Building A Bridge- By Sammie S.

This six weeks my groups worked on our topographic map, and the engineering module. For the discussion, we had to describe what engineering meant to us. To me, engineering is the use of tools and talent to invent and make things, then send them out to the public to make people’s lives easier.
For Challenge 1 we interviewed an engineering student, Jessica. She spoke about wanting to be an engineer to help people very passionately, and she really had an amazing story. We were really inspired by her, and it was really a great start to our module.
For Challenge 2, we built a bridge made entirely of toothpicks, glue, and thread. At first we came up with a truss style bridge, and we started building the triangles. Because we had a limited amount of time, we realized about half way through that our process was going too slow, and we wouldn’t finish the module in time. So, we quickly switched from a truss bridge to a sort of log bridge, which was a much sturdier and hardy design in the end, and I think it held more weight than the truss bridge ever could have.

image

Finally, we did a testing report. We put our bridge in between a gap that was 16 inches long. The testing report turned out as follows:
Testing Report:
Hypothesis: It will hold 500 grams.
Log style bridge.
Weighs: 39.5/40.0
Length: 19 inches
Ending amount it can hold: 800 grams!

We were really happy with the weight it could hold, because we estimated that it could only hold about 500 grams. It never broke in half and it turned out to be very successful!
From this module, I learned more about how to problem solve and how to make something out of limited materials. One thing we could have done better is that we should have looked ahead better, and calculated how much time we had versus our idea. But overall I think that we did a great job.

The Trials Of Making A Toothpick Bridge

Recently I completed the engineering module, the one with the bridge. This was my first engineering module of the year because, so far I had only been working with the media tech modules. I thought that the engineering module would be like the media tech modules. I was wrong, namely in the sense that one involves intense use of hands, and the other doesn’t. So it was a change of pace.
My group had a lot of trouble trying to figure out what exactly we wanted the bridge to look like and looking online did not really help with the ideas. But eventually we came up with our first idea.

Next came the trouble of building the bridge, there were setbacks from the start, beginning but ending with the fact that there was no more wax paper to lay the drying objects on. Our first try got thrown away, much to our dissapointment. So we had to start over and hope that we finished in time. As it turns out we didn’t, someone had to take it home to finish. I volunteered to take it home and finish, only when I got home, the bottom part of the bridge had not set properly, so when I tried to lift it off of the foil it broke into several pieces.

So I came up with a new technical drawing for the bridge, this design was simpler and easier to make, but also most likely more sturdy. The design looked like this:

IMG_20150123_145458

Unfortunately, easier did not mean that the glue dried any faster. So to problem solve, my dad helped me make a glue drying wind tunnel, that made use of foil that the gluey toothpicks had been resting on, and a hair dryer. We made the foil into a tunnel and squished the end of the foil around the hairdryer end, turned it on high and let it sit for 30 minutes when I came back the glue was dry and I was able to put the design together.

The finished product looked like this:

IMG_20150123_143725_kindlephoto-811801650

It may not be the most walkable bridge but it held 4000 grams of weight and barely bent so, I would call that a win.

~Almina Orbach ヾ(@⌒ー⌒@)ノ

When Inventor Becomes Your Friend

By: Isabella Vergara

In 7th grade PLTW, you learn quickly that Inventor is not at all your friend. It’s an awfully obnoxious application in which you can create 3-D shapes of your own devising. First, you make a sketch of what you want to make. You then extrude it (or make it longer, or give it its third dimension), and you have your first shape. This isn’t always so easy. Sometimes, if you’re making a more complicated shape, not all of the lines you made meet up, so you have to go through and make them meet up. Then, it’s possible that you’ve extruded it in the wrong direction, or too far, or too little. If you’ve made it that far, then assembling it is even worse. You have to give the computer specific instructions for how to assemble it, using vocabulary that I don’t really understand (this is also called constraining.) There are several different constraints for all different purposes, and even now, I couldn’t explain them to you.

Now in 8th grade, for the most recent project, we had to use Inventor to create a simple object that we had on hand. My two other group members both used their iPhone 5 and iPhone 6, but I have an android phone, which is very curved, and curves are pretty difficult to do on Inventor, so I decided to use my Chapstick container for this project, (or Module, as we refer to in class.) I thought, ‘well, it’s just a cylinder with a lid right?’ so, I opened up Inventor on my computer, and tried to figure out how put a grid on Inventor. I remembered from 7th grade that we had to have a grid, and that it would be super difficult to sketch without a grid. It took me about half an hour to finally realize that it was almost the end of class, and I had accomplished nothing, so I ended up just stopping, and deciding to sketch without a grid.

After that, things got a lot easier. My group had gotten a head-start on their projects, so they helped me along the way. There were a lot of things that we didn’t remember, so we did a lot of trying things out, then pressing Ctrl+Z  (for all the non-nerds out there, Ctrl+Z means undo) a bunch of times before we got to what we needed. I think that using Inventor for a second time has made me appreciate it more. I took a computer programming class over the summer, and I’m amazed at complicated Inventor is. Everything that you make looks nearly real, and the application really is smart. I wasn’t able to see what a great idea inventor is, because I was really annoyed at it. I guess knowing what you’re doing really pays off.

After just one-ish class periods (about an hour and a half), I had finished my Chapstick container. It didn’t take as long as I thought it would, and I think it turned out pretty good. I had two pieces, the cap and the actual Chapstick “Base” where the Chapstick-y stuff goes into. I really hated this next step of Inventor, because my group members hadn’t worked with it yet, and I had an awful experience with it last year. I had to assemble the pieces, so that the cap could go onto the Chapstick base. After trying some random things, and pressing a few buttons here and there, I had managed to make the cap go up and down above the base, but the cap would go past the base, and it wouldn’t work. I asked Ms. Sauter  about it, and she said she wasn’t sure, and told me to look it up, because after all, Google is another smart invention that I should make use of. I knew it was smart to utilize the internet, but I didn’t know what to look up. “How to constrain a cap on Inventor?” “How to constrain a Chapstick container on Inventor?” I really didn’t know what to look up, because all situations on Inventor are completely different. I ended up leaving the cap as it was, because, after trying everything, there was nothing that I could do about it.

My group members were having completely different issues. They both used their iPhones as models, and one of them had an iPhone 6, which has curved edges, making it extremely difficult to create. She was able to create the shape, but she wanted to put pictures of her phone onto it to make it look like a real iPhone. The only problem was that she couldn’t put the picture on the round edges. She was working on doing this the entire class, and she realized that it was impossible to put pictures on the curved edges, so she ended up coloring the edges with a silvery aluminum texture, and finished her project, which ended up looking amazing in the end.

From this module, I learned that it’s okay to compromise, because sometimes, technology doesn’t always have the same ideas you do, so you have to be flexible to be able to finish. If you don’t, you’ll keep trying again and again to get it exactly as you want it, and you may not finish in time. It also applies to life—if you’re working in a group, and you have opposing ideas, you have to compromise instead of arguing the entire time, and never finishing. I also realized that you should always give it a second chance, even if Inventor is finicky, and annoying, you might find yourself appreciating it more in the end.Chapstick_Inventor_Image2

A 3D Printer? What!! By:Olga Hernandez

We recently found out, that we had gotten a 3D printer. If you are not familiar with the printer it is one of the most amazing things ever. 3D printing is a processes to make a three-dimensional object. In 3D printing, certain processes have to be used, in which layers of material are laid down under computer control. These objects can be of almost any shape you want.

Timages6AZ3I25Whe first 3D printer was created by Charles W. (Chuck) Hull in the mid-1980s. An as you can see we didn’t really put much of attention to the machine a long time ago. Until this past years. The reason is because it was only with certain measures and it had limits.

The fun thing about this printer is that it makes your life easier. You don’t have to make all the building, you can just 3D print it! Another thing is that it makes the impossible, possible.

This year in Chicago’s international manufacturing technology show, the world’s first automobile, whose entire structure was created using direct digit4734932_Gal manufacturing was made. It works as car works but it’s made out of little carbon fiber infused plastic pellets. The same plastic used to make Legos. The car weighs about 15,000 pounds and is powered by a battery, ages motors could work too. It reaches speeds of 40 miles per hour. Eventually, 3D car will be tuned to run at highway speed, and people will probably be even able to drive it around all the time. Like imagine if it can make that, what else will be next.

Knowing that the 3D printing doesn’t have limits, our school has gone crazy with it. We have printed elephants, trees, signs, longhorns, cases, etc. We have gone up to even printing animages 
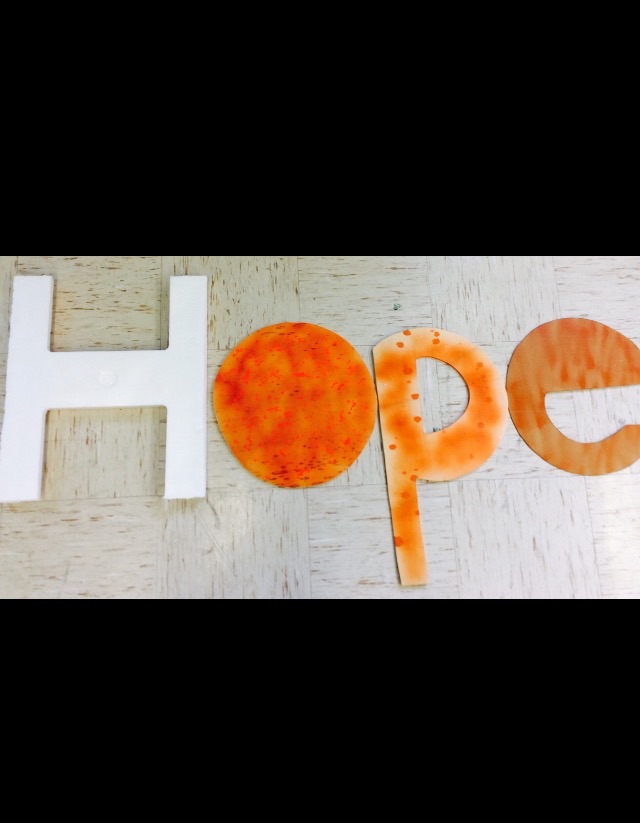
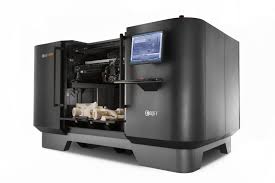
actual size bird house. For us this is really exciting, because not every school has a 3D printer. Here at Ann Richards we appreciate a ton of stuff such as this printer. We now that it cost a ton of money and because of that we enjoy it will it last and taking care of it.

        In PLTW this printer hasn’t been used yet, well at least not for 8th grade. In high school, one class had to create a flashlight that worked, and they decided to actually use the 3D printer. At the end, they got a real size flashlight working. The printer is really helpful, because you can create really important things, and not just make the everyday thing. Like 2D things. Now we can actually make them real, and make other people feel them.

I hope that one day, I get to use it for a project. I feel that if I get really good with it, which probably won’t be a problem, I will do great stuff, and it will be really helpful in the future. Now that the 3D printer is in school great things will be created.

Engineering

Mayrin Silva

5th period

Engineering

Hi, my name is Mayrin S. and my blog is going to be about Engineering.  Engineering is the branch of science and technology concerned with the design,building, and use of engines, machines, and structures. This module was my first one in engineering and it was kind of hard with the activity. Our first activity was to ask someone in engineering some questions about engineering. We did really good in this one. The second activity was building a bridge with toothpicks, cloth, and glue. Our bridges weight was 39.5 grams. The length was 19 centimeters. We did a test report which and the weight the bridge could carry was 800 grams. We actually thought that the bridge was not going to carry around 200 grams.

Intro to Photography-Andrea H.

The module that I just got done doing was the intro to photography, which is part of the media tech pathway. This module was different then all the others because it involved a lot of patience. What we did in this module was basically we created a pinhole camera and developed photos with it. I have to say that it was challenging because some picture would come out okay and some wouldn’t so we have to keep trying and trying until we got it right. During the process we learned that the sun actually takes the photos backwards so when we take photos in a camera the camera automatically fixes it for us so when we see the picture its right side up. I think that the camera was a big invention to society it allows us to capture precious one time moments like going to a concert to see your favorite band,etc. Cameras have evolved during time and they keep evolving hoping to make better use.

Hope

By: Marissa Pedroza

In PLTW right now we are making these sixteen inch letters. In my group we are creating the word Hope. So I got assigned the letter H. H was a very hard word because I wanted to think outside the box like my friend Savannah did. So I had a hard time thinking of something to do with my letter so I had a conversation with Mrs. Sauter and Mr. Oren. They both encouraged me to make my letter three dimensional. I had painted my letter a turquoise and I also used a hot glue gun.  I decorated my letter with silver and sparkly pipe cleaners, I put the pipe cleaners as a border for my letter since I didn’t want to show the sharpie that the letter was traced with. Then I got some glitter and these two butterflies to decorate on my letter. My friend let me borrow her jewels to also decorate the letter. This is how my letter came out.

hope

Another thing in PLTW is we are working on our maker projects for the maker fair. For me I’m not really sure what I’m doing but I want to do a group project since its my first year here at Ann Richards and most of the girls know what is going on. At first I wanted to do something with the Laser cutter, I still can but it would be hard to come up with something that is laser cut. So I think I am going to do some sculpture or model of something creative. Like a castle or an art piece or something 3D. I just want it to be creative but it’s a bit hard because it is also supposed to be helpful and I mean don’t get me wrong I want to help our environment but how am I supposed to make something creative and helpful if I can’t even come up with a creative idea. So I hope you see my dilemma but I’m sure I will figure something out.