Changes to the Engineering Program at ARS

Changes to the Engineering Program at ARS

Hello! Erin, Izzy, Kayla, and Bonnie here!  In the past year, we’ve undergone a lot of changes in our engineering program. First, we received a grant for our new  This sleek, modern facility has assisted us in our endeavors to learn more about engineering, and allowing us to make our creative ideas come into reality. Then, we added Art to our engineering program, changing the well-known acronym STEM to STEAM. Our school has really changed this year’s engineering program, but how did it begin in the first place? We’re about to take a walk down memory lane, all the way back to 6th grade when our first experience with engineering began. Then, we will make our way back to the present, where we will discuss our plans for the Makerspace, and STEAM.

file://localhost/Users/PLTW/Desktop/Screen%20shot%202014-10-10%20at%204.26.46%20PM.png

In sixth grade, we started learning about one of the aspects that define our school. STEM (Science, Technology, Engineering, Mathematics) is the basic engineering class that all sixth graders must take. In addition to doing a lot of small building projects made out of simple materials like popsicle sticks, toothpicks, straws, toilet paper rolls, legos, cardboard, and hot glue, we also learned about ancient numerals, math concepts, programming, and many other topics. In all truth, STEM was preparing us for all the challenges that we would experience in our future years at ARS.

Recently STEM has evolved to prepare new-coming sixth graders even more for our future classes in middle and high school. STEM has now become STEAM, so it stands for Science, Technology, Engineering, Art, and Mathematics. With the addition of Art, STEM now incorporates preparing for the arts. This is exposing us to a more creative side of education that allows students in this program to be able to show how their minds work. It encourages them to think in a different way.

file://localhost/Users/PLTW/Desktop/steam.png

Seventh grade PLTW and eighth grade PLTW were had many differences. In seventh grade, we started learning the basics of the design process. The projects weren’t as hands-on and independent, except for the project where we built real lawn ornaments out of wood, paint, and nails. At the end of seventh grade PLTW, we learned how to use the computer program, Inventor. Seventh grade PLTW was showing and preparing us for the more advanced projects in eighth grade PLTW.

In eighth grade PLTW, you have more freedom to let your creativity go. What I mean by this, is that everyone gets to choose what project, or “module,” they want to work on. So, everyone in the class is doing something unique and different. Having everyone doing a different project, makes the class less structured, but as I said before you get more freedom to do what you want (and not just what the teacher assigns you). Plus, you are always working in a group, so it isn’t as complicated. Another thing that is a lot different from seventh PLTW to eighth grade PLTW is that almost all our assignments are online.

From STEM/STEAM to seventh grade PLTW to eighth grade PLTW, it has been a little crazy.  All of the classes are very different. STEM (which is now STEAM) was more of a basic idea of what was to come. There was some building, but not much. In 7th grade PLTW there was lots of designing and building. We designed, sawed and built our own lawn ornaments. We also designed many things with a computer program. This year (8th grade) has been the most independent and involves more creation.  In 8th grade we are able to use our new Makerspace to make all sorts of  things, based on our interests.  In the area we are calling the “clean lab”, we can discuss, make new ideas, and work on the computers that are easily accessible to all students.  In the “dirty lab” we are actually making and building physical objects. Some renovations are still in progress, but we have started using it and are anxious to see the finished product!

What is Prototyping?


   Prototyping?? Whatttttt.


Have you ever made anything, and just gone straight to making the final piece? What happened to what you made? Did it go as you planned? Usually, when we do projects we’re asked to ‘just go for it’. But, what if it messes up? What if it turns out to be a disaster the night before it was due? This is why we have the idea of prototyping. We replicate the final project so we’re not left with a mess.

What is a prototype? A prototype is a replica of your final piece, where you can test out flaws. Since it’s made out of cheap materials you can fix your issues and correct it. So when you go to make your final product, you have already fixed what you know would’ve gone wrong. As 8th graders, last year we did a really big project where we had to design  lawn ornaments for a client. We couldn’t just make something out of the blue, we had to go interview someone and collaborate making the idea our own. We started out we by brainstorming and sketching our ideas out. It did take us a while, but was worthwhile. Our final piece was successful. You could say that a lot of people thought the process we used to develop our ideas was a big waste of time. But after we had finished, some of us realized, that if we hadn’t made our prototypes, some of our project would’ve failed miserably. If we hadn’t practiced using the saw to cut our designs out of the wood, and had just gone and cut with our final pieces of wood, the people with the more intricate designs’ boards would’ve broken.


             Why Prototype?


  • It’s cheap, so if you mess up it’s not like you just wasted a lot of money.
  • You can see all the flaws you have
  • You can correct those flaws
  • Your final piece will be flaw-free

There are many ways to make a prototype. You can use any materials you want. Sometimes the materials you want can change, so be open to new materials. You start your prototype up by first making a technical drawing, that shows a scale model of your vision with dimensions so you know how to make it! You can also transfer your invention into a 3D software, such as Inventor or Google Sketch Up. Once you have created your visual included with dimensions you need to make a materials list. Always have a budget in mind so you don’t over spend! Remember, your prototype is a first model of your final product, you don’t want to spend too much money on it, and plus, what if your invention is faulty! Then take your materials and build your prototype! Sometimes, your invention can be very tricky. Certain people tend to hire professional prototypers, who are specialized in making, well prototypes! But those people cost a lot!


Here are some prototypes of things you see a lot

Polaroid Prototype

A polaroid Camera

                     An ipadipad prototype A guitarGuitar prototype

How will we use it?

When we do modules we are given challenges, usually one is an independent challenge and the other one is a group challenge. For our group challenges we usually have to make something. We have to go through a process. Weprototype everything we do. Even this blog post is a prototype. We are fixing it as we go along. We make a replica of everything we post so we can fix it, and make sure our final product that is getting graded isthe best possible.

Later on in the year, we will apply to make a makers project. We will use the design process to invent something that will beuseful to our basic needs. In order to make this idea a reality we will have to test out our ideas by making a prototype. If we decided to just go ahead and produce our final product, we would see that we would have ended up with a lot of flaws. If we used expensive materials, we would’ve just wasted a lot of money. So, prototyping as a whole is a great thing. We can fix what we need to on a replica of your idea. No harm done.

Brain Fart: A Guide to Brainstorming

Helen Foster, Truc Ly, & Isabella Baladez

5th Period

When working in the Makerspace, there are many difficult problems to solve, which is why there has to be creative people like us to solve them. Projects and expectations are thrown at us all the time, and it’s our job to come up with a solution. For many of us, the most difficult part of any of this is brainstorming ideas. We constantly are required to think and use all of our brains to come up with new ideas and innovations.
“Whenever I sit down and try to think, my mind goes completely blank! It’s strange because as I go through everyday life, I’ll have ideas for something I could do or make, but when I actually try to come up with ideas, I can’t think of any at all, I think one of the main causes of this struggle is pressure.”  -Kai Bovik

It’s really hard to think under pressure, especially when you have to try to do something super fast. Not all of the ideas you come up with are usable, and the ones you do like may be too complicated or ineffective. Once you come up with an idea you use and start executing it, you begin to think of other things you could have done and how you could improve whatever it is you’re trying to do. It’s all about getting your brain going and in the mood to work and design.

This problem can be overcome, though. There’s always a plan or idea in the back of your mind somewhere you can use to make something amazing, but first we have to figure out how to find it.

For our first project, we were simply given a problem and some basic a box
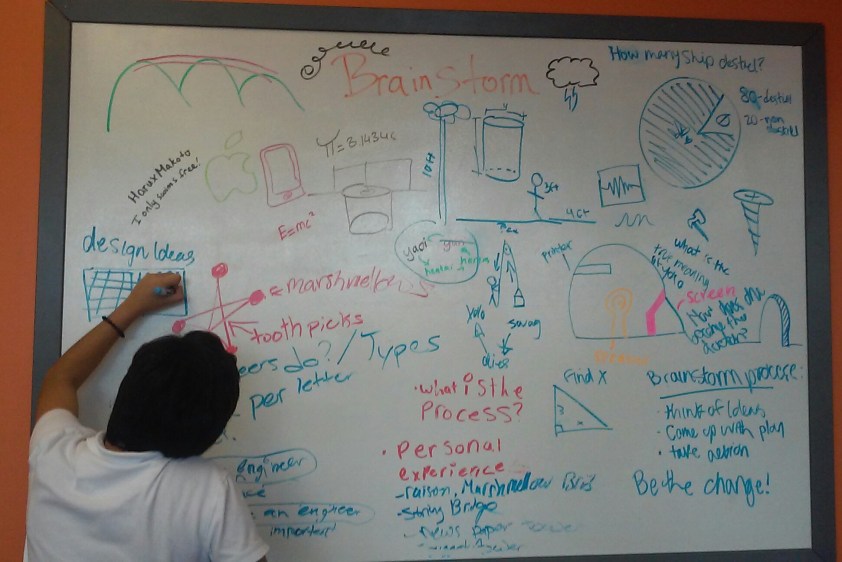
instructions   on the process we should go through to solve it. We had to figure out what we were going to do to solve it and how to execute our plan. The first step in this process was to create a design brief. These are extremely helpful when you’re trying to come up with an idea, because they put all of the basic information you need in one place. They make you think about the little things, too. Who’s our client? What are we going to be turning in? When is it due? Answering all of these things will help significantly in the long run for each project. After finishing this, we needed to start brainstorming solutions.

In the scenario we were given, a cat was stuck in a 10 ft deep hole, and we had to find a way to get it out. While brainstorming, we wrote down every idea we had,barinstorm process2 even the most ridiculous and unreasonable ones. Some of the things we came up with were so bad we would sit and laugh at the stupidity. This is still all part of the process, though. To come up with something good, you have to start with something bad and work from there. If you really want to come up with something good, think about other products that are used to do something similar to what you’re trying to do. For example, we had to get something out of a deep hole. What’s another tool used to do this? A well, so we thought of a similar invention that could be used to get a cat out rather than water.

Once you’ve put out any and all ideas you have, draw them in a design matrix. This is a very helpful tool that helps you think about the pros and cons of all of your thoughts. Include anything you’ve thought of there, it doesn’t matter if they may work or are useless, it’s important to think about everything. Make sure you do include some of your thoughts that might actually work, though, or your final product won’t exactly be very helpful. This design is for anotherdesing matrix person, not just your own, so don’t be too crazy, because your ideas suppose to relate to the design or problem statement. When they’re all written down, come up with categories you want to test the usefulness of each product by. For ours, we included variables such as cost, safety, durability, reliability, and time. Each of these is a factor that should be thought about when choosing a final product.

Collaborate with a group to help generate conversations about your ideas & get second opinions to improve your products. It also helps to get a few outside point of views from people outside of who you’re working with, because sometimes you get so
caught up in what you’re doing and you don’t take the time to see the big picture and how everything you’re doing fits together. If you really need to get brainstorming and your mind is blank, just start a conversation. You never know how the simplest idea can generate the best results.

The Engineering Pathway

Sage O’Brien, Alexis Miller, Lauren Gredicek, & Olga HernandezFeatured image

There are 3 main pathways you can choose at ARS, Engineering, Bio-Med, and Media Tech. In our Project Lead The Way (PLTW) class we had the option to do one of the three pathways which our modules are based off of. Our group chose Engineering because we all found a lot of interest in building and designing. After we chose our module it was time to start!

Our first module was based off the design process. We learned about all things that were necessary to make a design and execute our plans. The first step of the design process is define the problem. The problem was that Ms. Rutz was having a dance party but her phone was not producing music loud enough. We thought about the problem and what we had to do. We decided to make her a speaker that would help increase the phones volume. We brainstormed ideas, then used the design matrix to score each design. When we created our design matrix, the first thing we made was the criteria. Then we picked our scale, which was 1-5, 5 being the highest. Once we settled on an idea we built the prototype. We found that the sound was getting lost in the cups so we had to innovate our design until we noticed an improvement in sound quality. Our Final product was done and ready to turn in. We had to check our solution to fit the criteria, then once we were sure it did we turned in our final product.

After learning the design process we had to apply the knowledge we learned to the our new module. In the Engineering Module it challenges you to build a bridge that can withstand the most weight. To qualify for first place your bridge had to fit certain requirements. The requirements were…Featured image
-only use toothpicks, cotton thread and elmer’s glue.
-16” span
-No more than 40g

We followed the same steps of the design process that we did for our speakers; and we were able to produce a wonderful, final product.

When we were building both the speaker and bridge, we learned, not everything goes the way you plan. When your design doesn’t go as planned, you can’t just quit. You have to be able to think of ways to make your design better. In life, you have to do this all the time. Experiencing the engineering pathway gave us the skills of learning how to think of new ideas. We also realized how important it is to have theese skills. Life is a game of trial and errors, and if you chose to give up the first time around, you’ll never be successful in what you’re trying to achieve. Sometimes your worst mistakes lead to your greatest achievements.

Choosing to do the engineering pathway has allowed us to learn how to carry out a project when given criteria. This is a very useful tool in life and can be applied to many aspects of our lives, present and future. It has also allowed us to build our ideas and express our creativity while collaborating with a group of girls productively. It has taught us many skills that we will use throughout our lifetimes. Engineering in our PLTW class is an applicable and essential part of our lives.

Garden Ventura :)


         Have you been to Garden Ventura recently? If not you are missing out in a lot of new and beautiful things. Garden Ventura was possible now that the class of 2019 was working on it. The flowers are blooming and the garden is looking F-A-B-U-L-O-U-S. Garden Ventura is filled with alot of plants like tomatoes, squash, roses and many more. Garden Ventura has improved a lot since last year. Yes, our garden may be small, but it is well kept and beautiful. We have gotten a notice from the Central Texas Gardener show on Klru,  and they want to capture the beauty of our garden.

         Last year in science, the class of 2019 helped the 10th and 11th graders design the garden for their project. The high schoolers designed the trailer and we designed the garden. We were put into different groups and as a team we designed our own garden. At the end, we chose the best design and actually got to plant the flowers and vegetables outside the trailer. The vegetables and fruits were chosen to be the best for Texas weather.

In 7th grade we used the design process to design a garden that was appropriate to the the Texas weather. Our clients were the engineering students, they had designed a trailer and remodeled it, to be a teacher hang out place. First we had to look at plants that could stand the Texas sun. Then, we had to look and see at the space that we had. Based on the space we found plants that would only take up 1 foot by 1 foot. Then, we made a design to where we wanted the plants to be, depending on where the sun would hit. We made a 3d model of the garden that our group designed on the program “google sketchup”. We uploaded this up to our blog that we had. Once everyone had finished, we decided to show our ideas to the engineering students. They chose the idea that they liked best. Then we decided to make the idea into reality, and buy everything for the garden, of course under a budget. Once we bought all the plants we decided to get down and dirty. We watered the weeds and put cardboard over it, so that the weeds would die. We put mulch over the cardboard, and then planted our plants. The garden added an extra pop to the trailer.

So the design process has been the same since 7th grade when we used it to plan our garden it’s just that back then we did not know it was called a “Design Process”, we didn’t even know that we started working with the design process and exploring the 5 steps which are first:define your problem and second:tool up,third:make it, forth:improve your design and last but not least share it. Back in 7th grade we went through that same process but never really knew it had a name until we started working on modules (videos with steps and challenges we have to follow in a certain amount of time) and we realized we have been following the design process since 7th grade. Our 7th grade experience with the design process has helped us with being able to become more comfortable and oriented in the P.L.T.W (Project Lead The Way) Field.

picture by | Karla Jaramillo

picture by | Karla Jaramillo

picture by| Vanessa Lejia

picture by| Vanessa Lejia

picture by | Sara Pacheco

picture by | Sara Pacheco

Link

The glass tablet

attachment_42399949_sthumb

Evolution of the iPhone

Hi people! This is Almina and Aleeya here! So this first six weeks we a have learned a lot of things, even if we only did two modules, it seems like there is so much to learn;  in such a small amount of time. But the module that we felt the strongest for was the Media Tech module. Both of us like Media Tech, because we both enjoy animation and filming. While completing the media tech module we learned things about media tech that we never would have know before, like how social media is a form of media tech, because it allows people to get together all over the world through media.

When we started this module we had to think about what problem that we wanted to solve in the world, and we decided about the problem that tablets, phones, and computers keep getting bigger when they are supposed to be getting smaller and more efficient. While they are getting more efficient as their core processors get better, they are also getting bigger, for example the original iphone was 4.5 oz, while the new iphone 6.07 oz, that is a difference of 1.5 oz! Instead of weighing less it weighs more.

So our design is called The Glass Screen. It is comprised of a silicon, glass base which makes it both durable and see through. The inside is comprised of transparent, malleable microchips, giving it a clear appearance. It also featured curved knoches on the sides which enables it to be held onto easier. It is lightweight at 2 oz and works just as well as modern day electronics. We know the huge flaw in our design is that the technology used to create our design is still under development at the moment. But in a decade or so it might be possible and when it is, it will make a huge leap for technology development of the human race.

To submit our design we had to create a video in which we described the inspiration and the benefits of our design. The first thing that we had to do was create a storyboard which is kind of like a script, so that way we knew what to do as we made our video. While creating the storyboard we had to break the video up into individual scenes, this method is also used in the story making process of animation. When we were creating this we had a few disagreements over what we wanted to include and what we didn’t want in the video.  But we quickly came to an agreement that the two of us liked.

So overall we both really enjoyed this module. It was a good chance to explore our interests.


Almina \(*’(00)’)/ & Aleeya (=^•^=)

The First Step Towards The Future Of Media Technology

This is a scene from our video showing ILC being used for education.

This is a scene from our video showing ILC being used for education.

This is a scene from our video featuring the introduction of ILC.

This is a scene from our video featuring the introduction of ILC.

By: Andrea, Bella, and Khammila

After entering this new year of PLTW (Project Lead The Way) in September, we have been introduced to The Design Process and have deepened our understanding of the way it helps us in our class. The design process is a problem solving strategy to develop many possible solutions to solve human needs or wants. To practice using this process we completed a module related to Media Technology. This module required us to create a video based on a new invention that related to technology. The Design Process played a big role in helping us bring our ideas together and creating a design for our video.

Media Technology is just one of the three pathways offered at our school. The other two are Biomedical Sciences and Engineering. These pathways help us to decide what kind of career we are interested in pursuing. They are integral to the set up and mission of our school.

In our video, we featured an invention titled, the “I.L.C. Display”. “I.L.C.” stands for Interactive, Learning, Communication. The product is a glass screen that can be used for everyday tasks. Such as email, television, education, music, and visual communication.

When making the video we discovered how to use iMovie. It was very useful when finalizing our video, and is also an application that Media Tech students at our school use frequently. It gave us skills that will help with future video making in regard to editing.

Through this module our communication skills grew sufficiently. It helped us to finish our project successfully and timely. Together we helped each other focus and use our ideas to create new things. We hope to continue working together.

As young students it is important for us to contribute to the world of technology. This class and the tasks that we are assigned with, will help us to achieve this goal. The media technology module that we completed is just the beginning.

Getting to Know The ARS Design Lab

image

This is an image of the modules we can do during this school year.

image

This is our group. CCHY 🙂

Getting To Know The ARS Design Lab! Our design lab is a class based on technology and innovation. The main focus of this class is to help the community that surrounds us as well as innovating any object that serves for the technological purpose. This class also focuses on building and innovating things that already exist. The point of this class is to teach us the importance of working with limited materials and also, being capable of creating a change in the way an object functions for the greater good to help out our community.

This year in our design lab we are required to do lessons called modules. These “modules” are miniature lessons that help us increase knowledge while helping out the community. These modules have everything that you need to know about each of the subjects required. Down below will be a picture of a few lessons we focus on which are Math, Engineering, Media Technology, and Bio-medical Science.

For this class we have a room called the makerspace. This room is brand new and we are the first class to ever use it. Whoo! Whoo! 2019! We use this room to build and work on a variety of different projects. The focus of this classroom is to provide space for us to be able to create anything and everything. Are you interested in our makerspace? Well then, take a look at  a few of our pictures.

k6mzPulxAxuVLMKQAo2WFP8ZfxRVxGADrp1D_ZkRDUIVK6SSjCvJJdg-1x8b0vUxxusXh8_C8TdAnEHs3oYfF0Km74w5Kx_AcmuOt-C8TVygMuGm3J4UwLgqbFGvuyLjnw_s320

YHPCjsZosCn5uDnlFwWux-r8EPsKHXFfe8zlnoHvnydZGuWN09ENDdKwvtCLFRH7oLSNaUJRY8wYKkWPYRxav-75Y16F6PJZkcfFcXLgNo0ArLkP-Z2admzvnqBcjHYvJw_s320

“The Ann Richards School for Young Women Leaders dedicates itself to prepare young women to attend and graduate from college, commit to a healthy and well balanced lifestyle, lead with courage and compassion, and solve problems creatively and ethically in support of our global community.” The mission statement focuses on everything that we work on in the class and is summarizing what we do in our class the whole year.

“I honestly really enjoy this class because it allows us to view things in a different way. It helps us understand how complex the use of technology can be. I also enjoy how much freedom we have! AWESOME class :)” -Yoselin

“I think this class is awesome because we get to let out our inner creativeness and we get to have tons of fun! (:” -Hope

“I like this class because it covers all of the important things that come with technology. This class also teaches us how to use technology and helping us learn about the different uses.” -Calvinesha

“This class is very fun because we get to have a lot of freedom to give our ideas and do innovations we want which makes us think out of the box and this class just lets our knowledge grow more and more.” -Crystal

Blog post written by: Crystal, Calvinesha,Hope, Yoselin (CCHY) we hope you enjoy the blog!

Pros and Cons of the BYOD Policy

Recently, Ann Richards, our school, has started the BYOD policy. BYOD means “bring your own device.” The school started

15235844169_738e118e0c_z
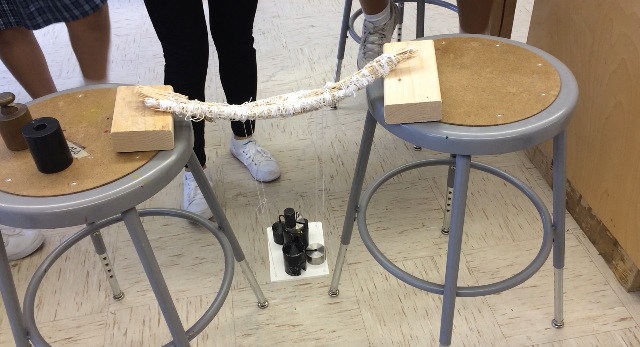
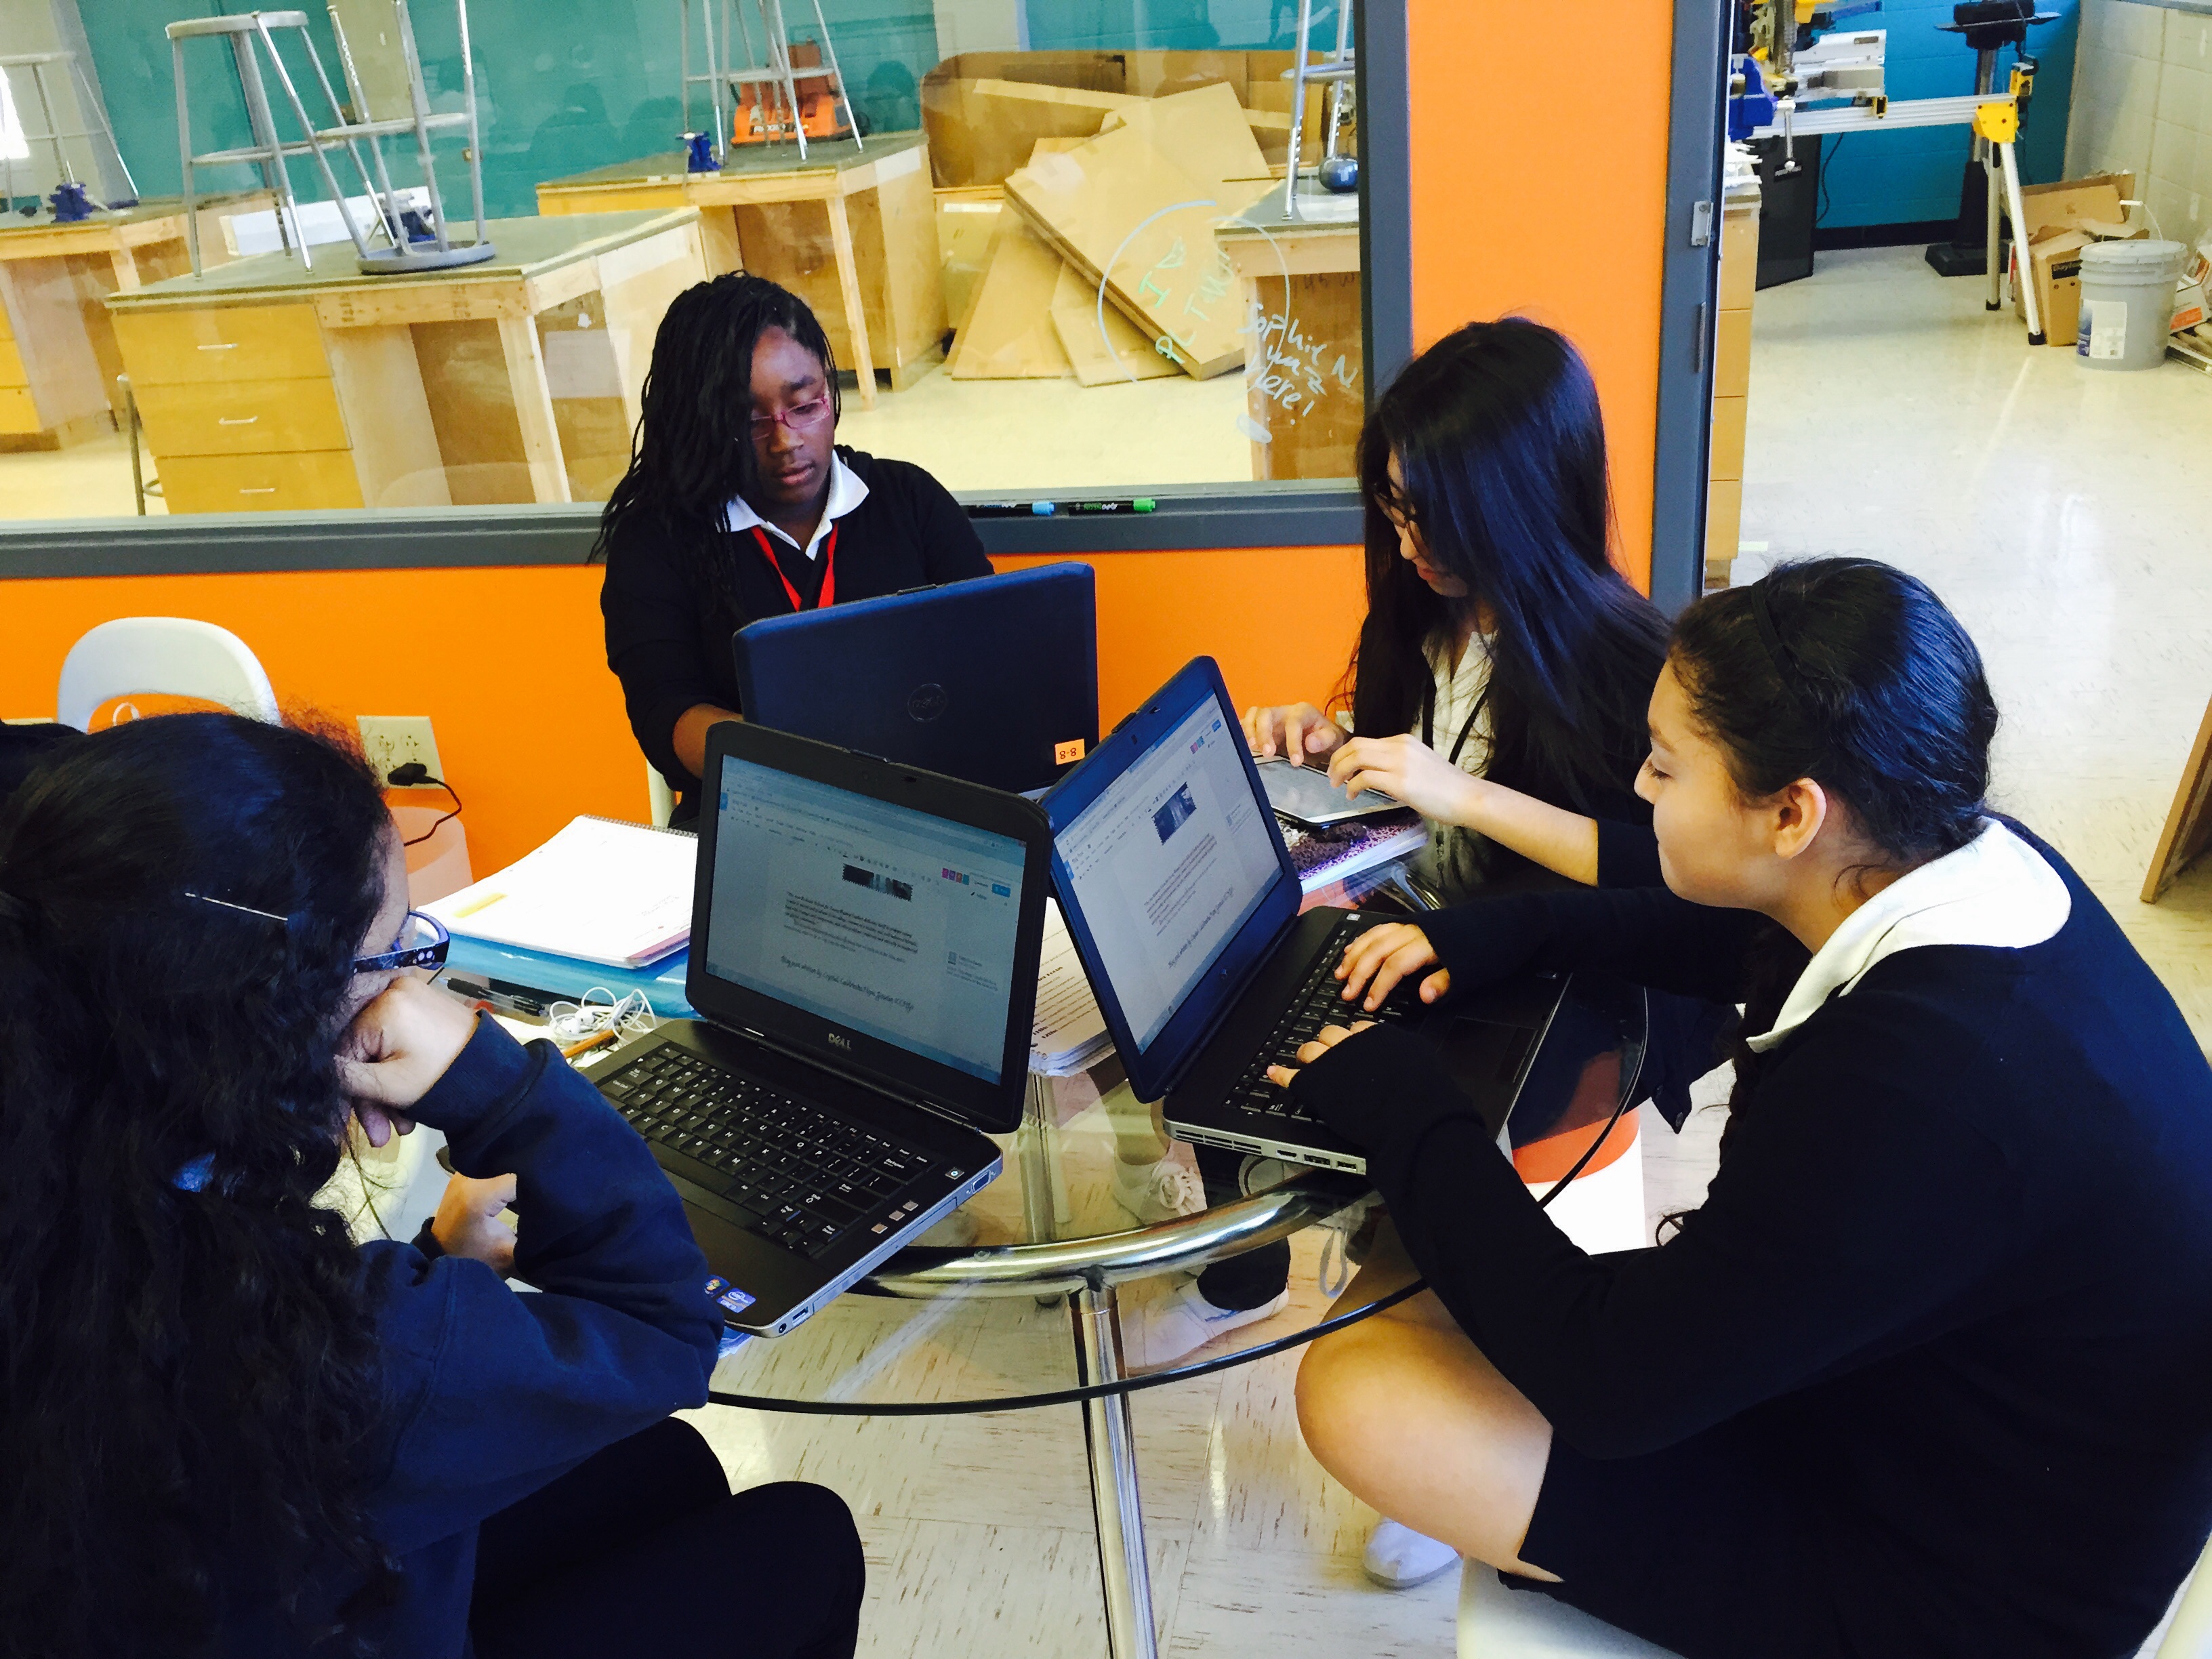
to let us bring our own devices so we could have a bit more freedom in school, to learn how to use it appropriately, and increase the positive use of technology in the classroom. Also then we won’t have to go through the process of using a school laptop or iPad. Those devices usually don’t work or take a lot of time to load, wasting our class time. Also our school noticed even before we started the BYOD policy how much we were using our own devices to do homework, projects, and class work. We decided to write this blog about the BYOD policy, to help everyone understand it. Below, we made a list of Pros and Cons on the BYOD policy.

Pros:

  • Student can bring their own device and not have to rely on the devices at school to work
  • Students can work on homework and things that require to be on the internet at times other than class
  • These devices are more portable than the devices in the classrooms.
  • Researchers found that 81% of Generation Z (our generation) prefers to connect wirelessly
  • 73% of Generation Z majority use social network to connect with others
  • Research has also showed that 22% of students at ages 6-9, 60% of students 10-14, and 80% of students 15-18 years old, own a cell phone
  • Cost effective- schools don’t need to provide as much technology and they don’t need to update their technology as often as they do
  • Things can be accessed at home and school with less difficulty
Cons:

  • The students are able to go to restricted websites because of 4g.
  • Easy to get distracted
  • Too many people on the school’s wifi will make it laggier
  • Some people might not have a device while others have more than 1
  • “MBTY-mine is better than yours” Some of the students who don’t have the newest things might feel left out while other have the newest and they tend to brag about it. This can lead to bullying and no one wants that.
  • Kids spend 7 and 1/2 hours everyday on their electronics
  • By the time kids go to college, they will have seen 200,000 acts of violence on TV, which will desensitise them to violence


Because of the obviously abundance of pros with the BYOD policy, our school decided to allow the policy. As this is a new thing at our school, there needed to be a few rules. Students should definitely have guidelines to using those devices, because otherwise, things could get out of control.

Guidelines:

  • Make sure students set security passwords to prevent hacking and theft.
  • Specify what social media sites are allowed.
  • Allow teachers to say whether students are allowed to use devices in class that day.
  • Set specific times students are NOT allowed to use their devices.
  • Make clear that if students get caught disobeying these rules, they will have their phones taken away.

The BYOD policy will really be beneficial to the students of Ann Richards. That is because we will be able to research without having to grab a laptop. Students will be able to use the flashcards on their phones, which will help studying become much easier. Language teachers can use websites like Kahoot to help students learn, and those websites require iPods and iPhones. If one of us needs to contact our parents, it is easy to, because they already have their phones on their person. Plus, when students are working in a group, they can easily communicate when not at school, because of their phones. The BYOD policy will also allow students to be more prepared when they beginning working in the 21st century, because workplaces everywhere use devices constantly.

Being in GTT (Gateway To Technology) we have to use technology for all our classwork. This can range from taking photos and videos to writing a blogpost, like we are doing now. This policy would help us accomplish our goals in less time with the same amount of quality. We can take our work home with us more often if we were compelled to do so. This policy is greatly needed and we can take advantage of it in class every day.15399549796_19bc3a9323_z

We have been using this policy in the classroom for about a week now, and so far, everything has been going smoothly. Projects are much easier to do, and the atmosphere of the classrooms are much better. We are all really excited about the policy, and we hope you will be too. So thanks for reading!

Darby Buscemi, Allegra Green, Bryana Sanchez, and Alyssa Infante

Work Cited:

InformED. N.p., n.d. Web. 1 Oct. 2014. <http://www.opencolleges.edu.au/informed/trends/bring-your-own-device-byod-10-reasons-why-its-a-good-idea/#ixzz3Eu97qB77&gt;.

Media Tech In Real Life

What is Media Tech?

Media tech is using technology to create media. Media tech includes blogging, videography, journalism, etc. Media technology helps us connect with others and the world around us. The main purpose of this can be broken down into three categories:

  • To educate
  • To entertain
  • To make life easier

For our second module, my group and I chose the intro to media Tech module. We had a lot of fun making the video and coming up with an innovation for future generations.

What Our Design Was

In our class we had to make a video of an invention we made, based off media technology. The idea we came up with was to put a system on the refrigerator that will help you make healthy food choices. The system would also tell you the nutrition facts of the food in the refrigerator. This system is easy to use and will help people make healthy and good food choices. Like our Ann Richards statement… “Commit to a healthy and well balanced lifestyles..”  ✌


How We Made The Video

First we came up with our idea, and wrote a thorough script for our video. We then used Lestle’s camera from home to filmwith, IMG_2798we borrowed Mrs. Sauter’s tripod, and headed outside to start filming. We started filming, and talking to the camera became very natural for us. After we finished filming we imported all the video clips we filmed and started editing. The editing was the hardest part for us, it was tough to incorporate three people into the editing process on one computer. Since we already had a bit experience editing we managed to edit well and make an awesome video. We used the song, ‘Smile Bright’ by Letters and Lights in the background of our video. Overall we tried to make our video original but also formal! We had so much fun filming and editing the video.

How Much Fun We Had

We had so much fun working in the Media Technology field. It was really cool to learn how technology works and to even come up with our own project! You never know maybe one day our idea will become a legit technology! Our whole group now wants to be in media tech when we go to highschool because it really stretches your imagination and makes you think outside of the box. There are so many things you can do besides video, we just got a little taste and so far the media tech field is our favorite. We want to start making more videos and explore this field more because there are so many options for what you can do and how you want to create!

IMG_2810

-Lestle, Avery, Ariela, Maddie